Hello again, and thanks for checking back in on us. In this update:
1. Hypertherm Powermax 1000 Plasma Torch
2. Compressed Air Filter/Dryer
3. Floating Torch Holder
4. Bridgeport Mill
5. Builder Updates
6. The 25 Year Old Macintosh Plus
Here are the details:
1. Hypertherm Powermax 1000 Plasma Torch - After a long and patient search we finally located the plasma torch that we were looking for. We found it for sale on Craigslist in the Sacramento area. Hypertherm is one of the original plasma torch manufacturers and they make an excellent product. The Powermax 1000 has a great range of cutting capability with the current adjustable from 20 amps to 60 amps. This should give us the ability to cut thin 0.040 aluminum sheet all the way up to 1/2" thick steel plate.
The first order of business was converting the handheld torch to a machine torch set-up. Using some ideas from the internet this was a pretty straightforward conversion. It turned out very well at a much, much lower cost than purchasing a new machine torch and leads. A new machine torch setup runs $600-$800 and we accomplished this conversion for ~$20.
.jpg)
.jpg) Now we just need to purchase some new tips and consumables for the machine torch. Hypertherm is making a new line of consumables that they call their "Thin Cut" tips. They have been having good success with these tips and they have apparently been getting good reviews from customers. More on that when we get the machine cutting some metal.
Now we just need to purchase some new tips and consumables for the machine torch. Hypertherm is making a new line of consumables that they call their "Thin Cut" tips. They have been having good success with these tips and they have apparently been getting good reviews from customers. More on that when we get the machine cutting some metal.
2. Compressed Air Filter/Dryer - Reading the forums about plasma cutting, it has become readily apparent that you have to have dry air to have good success cutting with plasma and to get decent consumable life. To that end we bought a desiccant air dryer, a filter, regulator and bunch of air plumbing to come up with this application. It's all mounted on a recycled teletype cart to provide an "all-in-one" place for the torch box, filter/dryer, and cords, etc. In addition to this setup, we spent a day plumbing compressed air to the other side of the shop to supply the air to this cart. Another day was spent running an 8 gauge 40 amp electrical circuit over to the other side of the shop to supply power to the plasma torch.
  3. Floating Torch Holder - In preparation for adding the automatic torch height control, we need to have a floating torch holder. These are for sale online, but some cost as much as $1700. Using ideas gathered from several designs found online, we put together our own torch holder. Here are some pics of the assembly.

 Just before leaving for work this last time the UPS truck delivered the leadscrew and stepper motor that will do the Z axis movement. Here's a rough idea of how the leadscrew will be placed into the unit:
 Once we finish the torch holder the next step will be to purchase the auto height control electronics and software and convert our TM1 table to a Mach3 table. We'll still use the TM motor control box, but it will now be controlled by the Mach3 software. This setup will give us true, digital, full 3D toolcut path capability (and arc voltage height control). More to follow on this.
4. Bridgeport Mill - Since buying the company from George, he as been telling us that we need to have a mill. Well, recently a buddy called and said that he'd found a "smokin' deal" on a mill on Craigslist. To make a long story short, after renting a drop deck trailer and and putting in and 18 hr day (that included a trip to the San Franciso Bay area), we now have a gently used Bridgeport mill. While it still needs to get hooked up to 3-phase power (need a rotary phase converter) and we need to get the necessary tooling - we now have a mill.
 Overall, it seems that the mill is in great condition for the price - with just a few minor repairs (and a good cleaning) needed. So far we've spent a day cleaning the lower part of the mill, lubricating the ways, and getting the DRO (digital read out) to work. The DRO sensors were very dirty and needed alignment, but now work great. This tool will be invaluable in producing parts for our first aircraft and is a necessity for making the accessory gear drive and PSRU parts for the engine. More to follow.
5. Builder Updates - Our biggest news on the builder front is that we have had some great conversations with Bud Tedesco, the owner of Kit #16. Bud reports that he is almost completed but has a few items to complete before his first flight. He is hoping to do his maiden flight by the end of 2009. Here are some pix from Bud:


 Great work Bud! We also got Bud hooked up with our Yahoo Prowlerbuildersgroup and look forward to learning a lot from him on building the Prowler. Congrats Bud and we are all looking forward to your first flight. Thanks for joining the group.
There has been a lot going on with all the builders recently. We now have had some kind of contact with owners of all but 5 of the original 16 kits that George produced. Recent info:
Kit #1 & Kit #13 - Rick is proceeding with his plans for his two planes. Check out his latest info here: http://www.rocket-boys.com/prowler.htm . Rick has gathered a great collection of Prowler info on his site. Check it out.
Kit #5 - Currently owned by George Morse. It is still for sale. You can see pix of this aircraft on Rick's site (above).
Kit #7 - Bryan Davies is still making good progress. His work lately has focused on several re-designs to address issues that George had made us aware of and issues from several builders. These include the tailwheel strut, a negative G mod to the fuse-to-wing junction, hyd cylinder attach brackets for the MLG. More to follow on these - but thanks for the great work on these areas Bryan!
Kit #10 - Ray is continuing to make great progress on his airplane. He's recently installed autopilot servo motors and is working on his avionics/panel installation. He just received his UMA engine gauges and reports that they are very nice units.
Kit #11 - Ben is in the process of gathering up all of the outstanding parts he needs after completing an inventory of his kit. He is working with Bryan to buy many of the parts he needs that Bryan has available. The rest we will be working on with Ben in the coming months.
Kit #12 - Chuck should have recently flown his airplane for about an hour. He was planning to do it in the next couple of days as reported by Ray. We'll report more when we hear about the flight.
Kit #13 - See Kit #1 above.
Kit #14 - Steve has fixed the issues with his Prowler that came up in the initial flights. He should now be able to enjoy flying the plane and the hard work that went into building it. Congrats Steve.
Kit #16 - Welcome Bud. See above.
Kit #17 - Cabi has been doing a lot of work on creating his drawings for using his plasma cutter to cut his wing spar parts. In a recent email from him he says that he was about to strap a Sharpie to his plasma table and test draw his wing spar parts to check them for accuracy. We'll report more on this later. On another note, Cabi will be part of a feature article in the March issue of "Flying". He is also going to be in a BBC production on the U2 which will air this summer in July. Keep an eye out for that. Nice work Cabi.
Kit #18 - These jokers can't seem to get anything done on their airplane. Seems that they've been blowing all their time and money trying to get some defunct kit airplane company going again. What are they thinkin'??
6. Macintosh Plus - When we got the company assets from George one of the items included was an old Macintosh Plus computer. By "old" we mean really "old." Do you remember "boot disks?" Well, there was also a pile of old 3-1/2" floppy disks. Turns out that there is some good info on some of these disks. Mostly it is just good "history" info that may someday be useful. In any event, we're spending any "extra" time we have (yeah - right) to print out these old files. Using this old clunker has given us renewed appreciation for today's computers. It takes about 15 disk swaps and 15 minutes to print out just one average sized file on the old Macintosh dot matrix printer. But, it's also kinda fun - like archeology.
Thanks for stopping by.
1. Hypertherm Powermax 1000 Plasma Torch
2. Compressed Air Filter/Dryer
3. Floating Torch Holder
4. Bridgeport Mill
5. Builder Updates
6. The 25 Year Old Macintosh Plus
Here are the details:
1. Hypertherm Powermax 1000 Plasma Torch - After a long and patient search we finally located the plasma torch that we were looking for. We found it for sale on Craigslist in the Sacramento area. Hypertherm is one of the original plasma torch manufacturers and they make an excellent product. The Powermax 1000 has a great range of cutting capability with the current adjustable from 20 amps to 60 amps. This should give us the ability to cut thin 0.040 aluminum sheet all the way up to 1/2" thick steel plate.

The first order of business was converting the handheld torch to a machine torch set-up. Using some ideas from the internet this was a pretty straightforward conversion. It turned out very well at a much, much lower cost than purchasing a new machine torch and leads. A new machine torch setup runs $600-$800 and we accomplished this conversion for ~$20.
Now we just need to purchase some new tips and consumables for the machine torch. Hypertherm is making a new line of consumables that they call their "Thin Cut" tips. They have been having good success with these tips and they have apparently been getting good reviews from customers. More on that when we get the machine cutting some metal.2. Compressed Air Filter/Dryer - Reading the forums about plasma cutting, it has become readily apparent that you have to have dry air to have good success cutting with plasma and to get decent consumable life. To that end we bought a desiccant air dryer, a filter, regulator and bunch of air plumbing to come up with this application. It's all mounted on a recycled teletype cart to provide an "all-in-one" place for the torch box, filter/dryer, and cords, etc.
In addition to this setup, we spent a day plumbing compressed air to the other side of the shop to supply the air to this cart. Another day was spent running an 8 gauge 40 amp electrical circuit over to the other side of the shop to supply power to the plasma torch. 3. Floating Torch Holder - In preparation for adding the automatic torch height control, we need to have a floating torch holder. These are for sale online, but some cost as much as $1700. Using ideas gathered from several designs found online, we put together our own torch holder. Here are some pics of the assembly. Just before leaving for work this last time the UPS truck delivered the leadscrew and stepper motor that will do the Z axis movement. Here's a rough idea of how the leadscrew will be placed into the unit:Once we finish the torch holder the next step will be to purchase the auto height control electronics and software and convert our TM1 table to a Mach3 table. We'll still use the TM motor control box, but it will now be controlled by the Mach3 software. This setup will give us true, digital, full 3D toolcut path capability (and arc voltage height control). More to follow on this.4. Bridgeport Mill - Since buying the company from George, he as been telling us that we need to have a mill. Well, recently a buddy called and said that he'd found a "smokin' deal" on a mill on Craigslist. To make a long story short, after renting a drop deck trailer and and putting in and 18 hr day (that included a trip to the San Franciso Bay area), we now have a gently used Bridgeport mill. While it still needs to get hooked up to 3-phase power (need a rotary phase converter) and we need to get the necessary tooling - we now have a mill.
Overall, it seems that the mill is in great condition for the price - with just a few minor repairs (and a good cleaning) needed. So far we've spent a day cleaning the lower part of the mill, lubricating the ways, and getting the DRO (digital read out) to work. The DRO sensors were very dirty and needed alignment, but now work great. This tool will be invaluable in producing parts for our first aircraft and is a necessity for making the accessory gear drive and PSRU parts for the engine. More to follow.5. Builder Updates - Our biggest news on the builder front is that we have had some great conversations with Bud Tedesco, the owner of Kit #16. Bud reports that he is almost completed but has a few items to complete before his first flight. He is hoping to do his maiden flight by the end of 2009. Here are some pix from Bud:
Great work Bud! We also got Bud hooked up with our Yahoo Prowlerbuildersgroup and look forward to learning a lot from him on building the Prowler. Congrats Bud and we are all looking forward to your first flight. Thanks for joining the group.There has been a lot going on with all the builders recently. We now have had some kind of contact with owners of all but 5 of the original 16 kits that George produced. Recent info:
Kit #1 & Kit #13 - Rick is proceeding with his plans for his two planes. Check out his latest info here: http://www.rocket-boys.com/prowler.htm . Rick has gathered a great collection of Prowler info on his site. Check it out.
Kit #5 - Currently owned by George Morse. It is still for sale. You can see pix of this aircraft on Rick's site (above).
Kit #7 - Bryan Davies is still making good progress. His work lately has focused on several re-designs to address issues that George had made us aware of and issues from several builders. These include the tailwheel strut, a negative G mod to the fuse-to-wing junction, hyd cylinder attach brackets for the MLG. More to follow on these - but thanks for the great work on these areas Bryan!
Kit #10 - Ray is continuing to make great progress on his airplane. He's recently installed autopilot servo motors and is working on his avionics/panel installation. He just received his UMA engine gauges and reports that they are very nice units.
Kit #11 - Ben is in the process of gathering up all of the outstanding parts he needs after completing an inventory of his kit. He is working with Bryan to buy many of the parts he needs that Bryan has available. The rest we will be working on with Ben in the coming months.
Kit #12 - Chuck should have recently flown his airplane for about an hour. He was planning to do it in the next couple of days as reported by Ray. We'll report more when we hear about the flight.
Kit #13 - See Kit #1 above.
Kit #14 - Steve has fixed the issues with his Prowler that came up in the initial flights. He should now be able to enjoy flying the plane and the hard work that went into building it. Congrats Steve.
Kit #16 - Welcome Bud. See above.
Kit #17 - Cabi has been doing a lot of work on creating his drawings for using his plasma cutter to cut his wing spar parts. In a recent email from him he says that he was about to strap a Sharpie to his plasma table and test draw his wing spar parts to check them for accuracy. We'll report more on this later. On another note, Cabi will be part of a feature article in the March issue of "Flying". He is also going to be in a BBC production on the U2 which will air this summer in July. Keep an eye out for that. Nice work Cabi.
Kit #18 - These jokers can't seem to get anything done on their airplane. Seems that they've been blowing all their time and money trying to get some defunct kit airplane company going again. What are they thinkin'??
6. Macintosh Plus - When we got the company assets from George one of the items included was an old Macintosh Plus computer. By "old" we mean really "old." Do you remember "boot disks?" Well, there was also a pile of old 3-1/2" floppy disks. Turns out that there is some good info on some of these disks. Mostly it is just good "history" info that may someday be useful. In any event, we're spending any "extra" time we have (yeah - right) to print out these old files. Using this old clunker has given us renewed appreciation for today's computers. It takes about 15 disk swaps and 15 minutes to print out just one average sized file on the old Macintosh dot matrix printer. But, it's also kinda fun - like archeology.
Thanks for stopping by.


 See Rick's website link (on the right side bar) for more information. We look forward to working with you and assisting you in getting your aircraft back together and kit built. We will post more about his plans once he gets his inventory done and has had an opportunity to come up with a game plan. Welcome aboard Rick.
.jpg) Cable guides are now installed and table tested. No more wires hanging off the ceiling!! The torch holder system mod is up next. Here's the "manual" torch holder before removal:
Cable guides are now installed and table tested. No more wires hanging off the ceiling!! The torch holder system mod is up next. Here's the "manual" torch holder before removal:.jpg) We are investigating modifying this to a "machine" torch holder that will also be able to be used with the torch height control system. More to follow. Here's a pic of the current setup:
We are investigating modifying this to a "machine" torch holder that will also be able to be used with the torch height control system. More to follow. Here's a pic of the current setup:.jpg)
 We found a day we both had some time and I went to visit him. We spent the better part of a day trying to flatten the "learning curve" on using his setup. The parts are still being worked on, but after seeing his machine work I realized that this is the way to go - when it comes to producing Prowler parts.


 The table came with the computer setup, but has had the hard drive reformated and a new operating system installed. The monitor has been replaced with an LCD monitor. We still have a lot more work to do before this becomes a useful tool in the Prowler shop. First off, we still have to purchase a plasma torch for it. I have been trying to learn how to use the software and I'm having some modest success. I have modeled my own "sample" part using the Torchmate CAD software. I have exported this file from the CAD software as a .dxf and then imported it into the Torchmate software that actually runs the machine. This software converts the "sample" part .dxf file into something called "G-code" which is what actaully makes the table move in the correct way to cut the part.
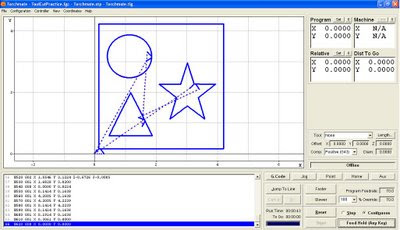 When we get ready to make another airframe, it should simply be a matter of putting the metal in the machine, pull up the files, and hit enter. Without having done any in-depth research, the hope is that we (using our system and Cabi's system) will be able to satisfy our production requirements - when we get to the point where we can start selling airframes.


 Also, the pieces were scribed to the pattern and then cut just outside of the scribe lines. This leaves enough material to file down the edges to a smooth finish. Turns out this represents a lot of filing. So, on to a better way.
 2) Cut two 1/4" spacer strips for each pattern. One spacer strip goes under the entire stack and provides room to have a counter-sunk bolt head. The other is to provide room between the roller bearing (that rides on the pattern) and the actual cutting part of the bit . This keeps the pattern a good distance from the cutting edges and prevents chewing up he pattern. See pic in item 4 below.
 4) bolt the "stack" together and adjust the router depth to get the correct height for the pattern to ride on the roller-bearing:
 5) Make a
  The next item to work on are the bearing blocks. They are rectangular blocks that surround the bearing and are clamped under the wing attach brackets.
 By mounting the drill deck (table) under the bench top the drill can just penetrate into the bench top and (most importantly) the head of the drill press is now height adjustable above the bench top buy loosening the drill deck handle and adjusting it.
 Make sure to square the head of the drill press to the bench top. We used a
 Vertical Stabilizer Sub-Kit - Armed with the new spreadsheets, we now have an idea of what inventory items currently exists in each sub-kit and what we will need to fabricate to complete an airplane. The first sub-kit on the list was the vertical stabilizer. Turns out that we had all but about 4 parts we needed to

 Once that was done we drilled the skin and built a crate to ship it to the "
 Now it's on to the fabricatiion and
  This is the steel sheets, steel tubing, bearings, hardware, etc., needed to assemble the Tail Group Sub-Kits and the Wing Group 1 Sub-kits. Hard to believe, or maybe not, that including shipping this pile of stuff represents over $1K worth of materials. In some cases there is enough material to make more than 1 airplane, but some things have to be bought in a minimum order - so that's what ya get.