Well, AirVenture 2019 was a great one! The XP-82 was outstanding and the Wed & Sat night airshow were typically excellent - with a new finale!!
In this update:
Prowler Stuff:
1. Original Prowler Is For Sale
2. Two Missing Prowler Kits Located
2. Builder Updates:
2.A. Francis Building & Sealing His Forward Fuel Tanks
2.B. Bryan Has Retired
3. Making Cockpit Floor Stringer Dies
Non-Prowler Stuff:
4. AirVenture 2019
5. Fixing 5th Wheel RV's
6. Hardinge CNC Lathe Progres
I hope everyone is having a great fall season. I've been trying to clear some projects off my "To-Do List" that have been hanging around for quite some time now. Not the least of which is the Hardinge CNC lathe project. With the kids all out of the house now, I'm able to devote more of my days off from the "Day Job" to getting some of these things done. The kids have been doing the holiday yard decorations for years now, but with them all moved out it's mom's job. But, I decided to have a little fun, too .... HAPPY HALLOWEEN!!
On with the update........
Prowler Stuff:
1. Original Prowler Is For Sale - In early Sep, I had a fella send me an email asking about the Prowler for sale on Barnstormers. What? I didn't know anything about it, so I went to the Barnstormers website and sure enough, I found this....
Turns out, this is the original Prowler that George Morse built and eventually sold to Curt Hughes in North Carolina. I have had a few email exchanges with Curt, but I have not talked with him. Bryan has talked with him on several occasions however. In fact, Bryan bought his kit from Curt. I have not heard if this Prowler was sold to anyone, but I checked Barnstormers again last night and there are no longer any Prowler ads posted. If anyone knows any more about this Prowler, please send me an email,
here.
2. Two Missing Prowler Kits Located - So, until early this past Sept, there were 3 of George's original 15 kits that I have not located or did have any contact with the last recorded owner. One of these kits (Kit #8) I had no information on at all. The other two I had sent letters to the last owners on record a couple of times and never gotten any response (Kit #2 & Kit #3). I am now happy to report that 2 of those 3 kits have been located!
First, during my discussion with Bryan about the original Prowler for sale (above), he mentioned that Curt had sold "the other kit". I always only knew that Curt had the original Prowler and the kit that Bryan had bought from him. So, I asked, "What other kit?" Turns out, that was Kit #8. Apparently, Curt had bought the original Prowler and TWO additional kits!! At some point, Kit #8 had been sold to a fella named Fred who lives in GA. Bryan just never knew that I didn't know about that "other kit!" So, one more missing piece of the puzzle had been found!!
Then, out of the blue I got another email from a fella named Darian in Vernon, BC, Canada. Turns out Darian now has Kit #3 that formerly belonged to Ed Radu in Calgary, Alberta Canada. Darian reports that this kit is still new in the crates and has never been opened or touched. He says he has the canopy and the MLG and everything firewall aft. This kit is
FOR SALE, so if you are interested, please send me a note via the
feedback link and I will put you in touch with Darian.
That leaves only Kit #2 that I have not located or have had contact with the owner. The last recorded owner of Kit #2 is Mr. Everett Reynolds in Missoula, MT. If anyone has any info on the status of this kit, please send me an email via the feedback link on our website, here:
Feedback
So, right now, to the best of my knowledge, here is a list of the
CURRENT PROWLER KITS / AIRCRAFT FOR SALE
Kit #A (Original Flying Aircraft), Curt, NC, USA
Kit #3 (Un-assembled Kit), Darian, BC, Canada
Kit #16 (Flying Aircraft), Bud, FL, USA
Kit #18 (Un-assembled kit), Todd, CA, USA
Also, Kit #8 might possibly be for sale, but I have not been able to confirm this with the current owner yet. More to follow.
2. Builder Updates:
2.A. Francis Building & Sealing His Forward Fuel Tanks - Let me start out by saying that, currently, Francis continues to be the most active Prowler builder and that I really appreciate him sending me periodic updates with pictures to share. (Eric is probably also very active with his Prowler, but I don't have his latest status).
Most recently, Francis has been building and sealing his forward (outboard) fuel tanks. It looks like the first order of business was to locate fuel sumping fittings:
Then, he either had someone machine these for him or he did it himself (not sure). But here is his drawing and the stock to make the flanges shown on the upper left:
Looks like the following pic shows him countersinking the flange mounting holes for installation into the wing skins:
And, here is one of them installed on the fuel tank skin:
Here is a fuel tank cap installed on the fuel tank skin:
And, here he is checking the fitment with the skin placed over the forward side of the outboard wing spar:
That looks awesome, Francis!! Then, the real fun began. In his August email to me Francis tells us again how much he likes his friend "ProSeal".....
Fuel tank drain
Fuel cap
And starting fu..🤬 sealant
And then, in early Oct his email to me with pictures was titled "A Day With My Friend...ProSeal" in the subject line. I'm not sure that I have the timeline of these following pictures exactly right, but here is where Francis sealed the forward side of the outboard spar with ProSeal:
And, the following pictures are showing the job he did getting the fuel tank skins cleco'ed to the nose ribs and sealed with his "friend"......
In his own words, here is the current status of Francis' fuel tank assembly:
Hello Todd
Last Saturday I had Prosealed and riveted on fresh Proseal [on] one rib,so😬🤯🤬🤢🤮
[In] The time [it takes] to squeeze the rivets the Proseal is not useable (dry) for the other ribs, so I [had to] discard the 3/4 of material!
In accordance with advice of some "choumack" [French word for "a sheetmetal guy"] today I have Prosealed and clecoed the other ribs and waiting [for] them to dry! I [will] rivet [them] next Saturday.
Less dirty [messy]!
Next Saturday, I hope that I can remove the clecos!😁
Thanks for all
Just last night, I got another quick update from Francis. He sent these pics:
It looks like those clecos did come out. The pic above shows the clecos out and rivets installed along the nose rib lines! Sweet!
From the side view above, it does not look like the rivet lines have any buckling or warping. It looks like the ribs that he did by just using Proseal and then putting in clecos to hold the rib in place until it was dry did well. Might be a technique to keep in mind. Thanks for sharing that, Francis. Here is his note with the latest pics:
Hello Todd,
In [while] waiting for the visit of OSAC inspection [French form of FAA] to close the spar I start[ed] the riveting of the leading edge [fuel tank]. I use ms20426 -4-3.5 instead -4-3 ,i think -3 are too short and -4 are too long!
Nicely done, Francis!! Thanks for the update. Great work, as always!!!
2.B. Bryan Has Retired - Recently, while emailing with Bryan, he told me of his upcoming final flight. Specifically saying:
Getting busy around here as the whole family is coming in for the final flight, even family I didn’t know I had... They will all be on the ramp parallel to the 9-27 Rwy awaiting the block in. I have a plan. Shoot an ILS to 9 circle to land 36. That should qualify as a fly by without registering a go around for performance metrics, I hope. Bryan
He later told me that the date was Sep 21st and that he was flying one of his shortest flight leg ever in the B777 for his last flight - OAK to MEM. I checked with him later via text about how it went and he reported this:
Ha! They closed the runway while we were enroute. However, I did overfly the 50 people that were on the ramp while landing on Rwy 18L and they were all impressed with the flyover. We have some awesome video. For one fleeting moment I had some emotion about the event. I'm over that now - on to a new life!
Bryan started working as a delivery driver for FedEx over 40 years ago. He worked as a FedEx driver while he built flight time and eventually got hired by FedEx's internal flight department. After getting hired to that job, he waited for the next application window for FedEx line pilots and was given an interview and hired to the line. He was also allowed to keep all of his longevity time as a FedEx employee! So, in total, he has flown the line at FedEx for over 31 years and retired with 42 years of longevity!!
CONGRATULATIONS, Bryan!!! You have had an incredible career! You have also been a wealth of help and information for me with regard to Prowler airplanes. You have also been a great friend! Enjoy your retirement!!
Bryan had an engine for sale during AirVenture. He displayed it at the RFA building during the show. On the last day we had to get it back to the RV's so that he could put it on the trailer. We decided that the easiest way to get the engine back to camp was to have Bryan ride in the back of the golf cart and hold the cart that he had the engine mounted to and pull it back. Here's what that looked like:
It was slow going, but it worked great! And, Bryan eventually sold the engine!
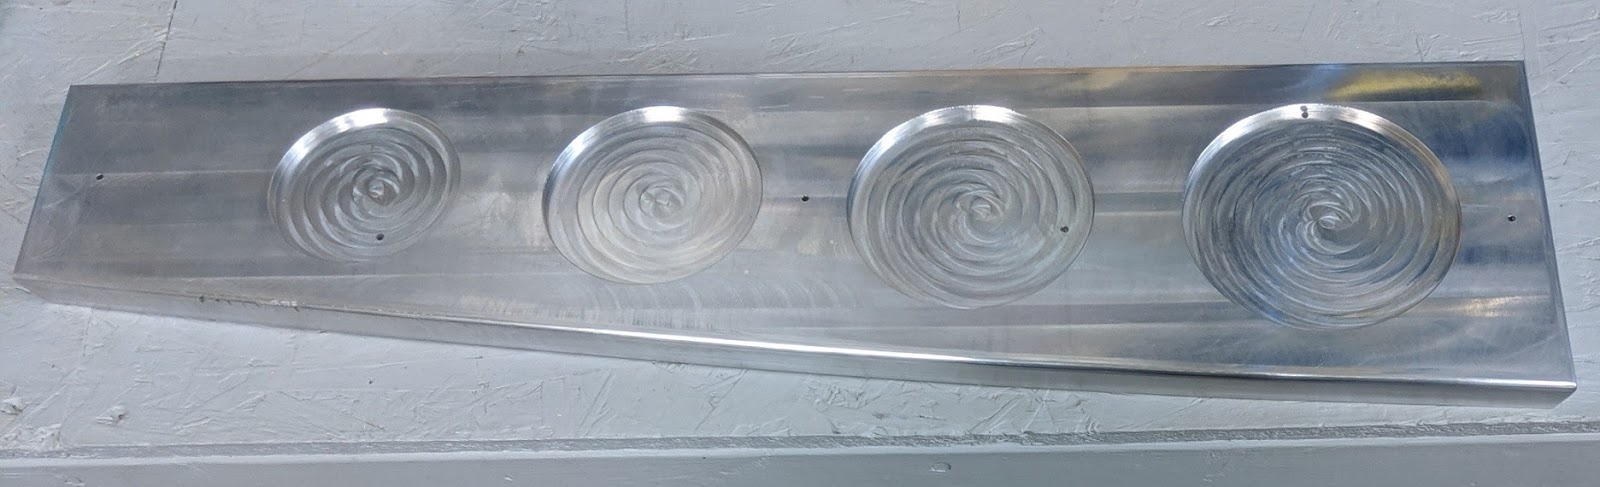
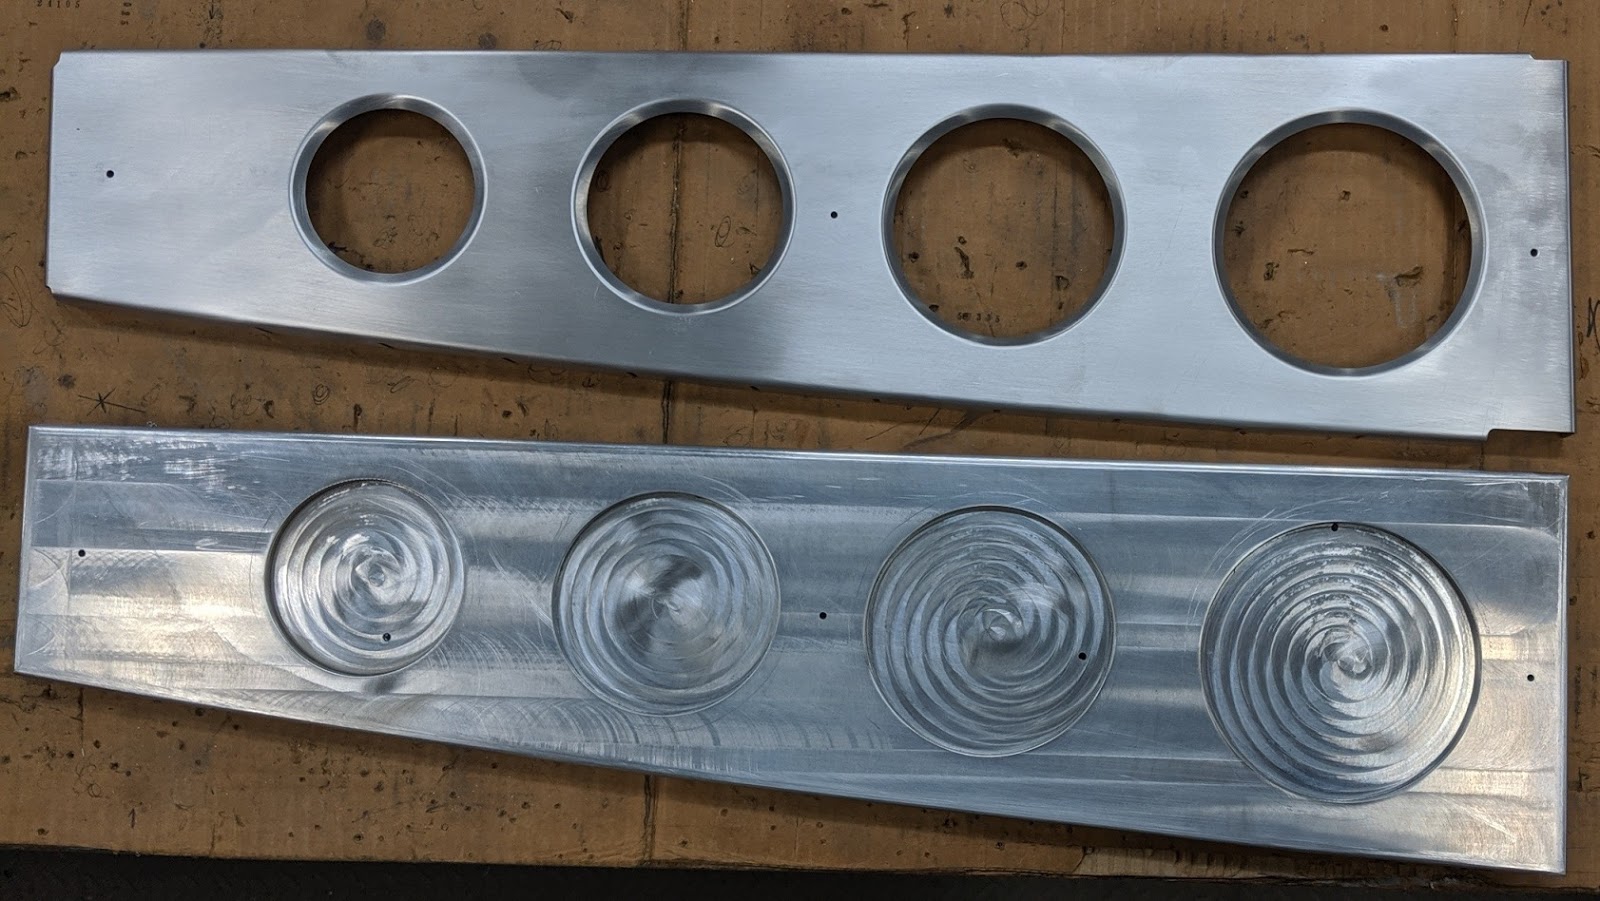
3. Making Cockpit Floor Stringer Dies - Last week, I was having a frustrating time in the shop trying to get some equipment projects finished. So, I decided to switch up to working on a Prowler project. The project currently at the top of the Prowler list is getting some floor stringers (part FFA22 & FFA23) made for Kit #18 that I have for sale. Before I can make the parts, I have to get the dies (form blocks) made. In a blog update in April I mentioned cutting the large pieces of 1" thick aluminum bar to make these dies. Here are the two rough cut dies on the bottom and the old pattern for the floor stringer part on top:

Eventually, the dies should look something like this:
The circles represent pockets that will be cut into the top of the die to allow for forming the flanges on the lightening holes. These pockets will be slightly larger than the lightening holes in the parts and when placed in the press, the rubber will bend the center edges of these holes down into the pockets and form flanges around them.
In order to machine these dies, the first thing that has to be done is figure out a way to fixture and hold the die on the mill table rigidly. I have a fixture plate that I have been using to make all of my dies so far. I figured I could still use this fixture plate, but I was going to have to make some other provisions to hold the fixture plate to the mill table (since the die is so large and covers most of the fixture plate up). Here is RH die sitting on top of the fixture plate sitting on the mill table:

It is not easy to see in the pic above, but there is just enough of the fixture plate exposed at the top (RH side) of the die to allow counter sunk screws to be put into T nuts in the top slot of the mill table. This will hold the top of the fixture plate to the mill table. However, the bottom of the die and the bottom of the fixture plate hang over the front of the mill table. I was going to have to devise some means to hold the bottom of the fixture plate (LH side as pictured) to the front of the mill table. So, I made up some steel blocks with thru holes for 3/8" bolts into T nuts in the front table slot and then have threaded holes vertically down through the blocks. Here is what those look like:

The bolts through the fixture plate have to have flush heads counter sunk into the fixture plate, but for measurement you can see a regular hex head bolt on the left above. I figured out later that the die will cover the hole in the fixture plate on the right front corner. So, here below, I had to thread the 1/4" all-thread into the bottom of the fixture plate and locked it with a jam nut. Then the all-thread passes through a clearance hole in the steel block. A nut on the bottom of the block that is bolted to the front of the mill table pulls the fixture plate tight down to the mill:
Here is pic of the left front side of the fixture plate showing that I did not have any flush head cap screws long enough to reach the anchor block:
I would have to get longer bolts the next day, but I continued on with the mounting of the die onto the fixture plate. Here is the ruff-cut aluminum die clamped in the correct position onto the fixture plate:
Then, I flipped it over and put it on blocks so that the clamps cleared the top of the table:
That allowed me to transfer punch the holes in the fixture plate onto the back of the die:
These are the transferred punch marks on the back of the die that will be used to drill and tap blind holes:
Once I completed drilling and tapping the holes, I mounted the die to the fixture plate. Then, I could mount the fixture plate onto the mill table. Here it is:
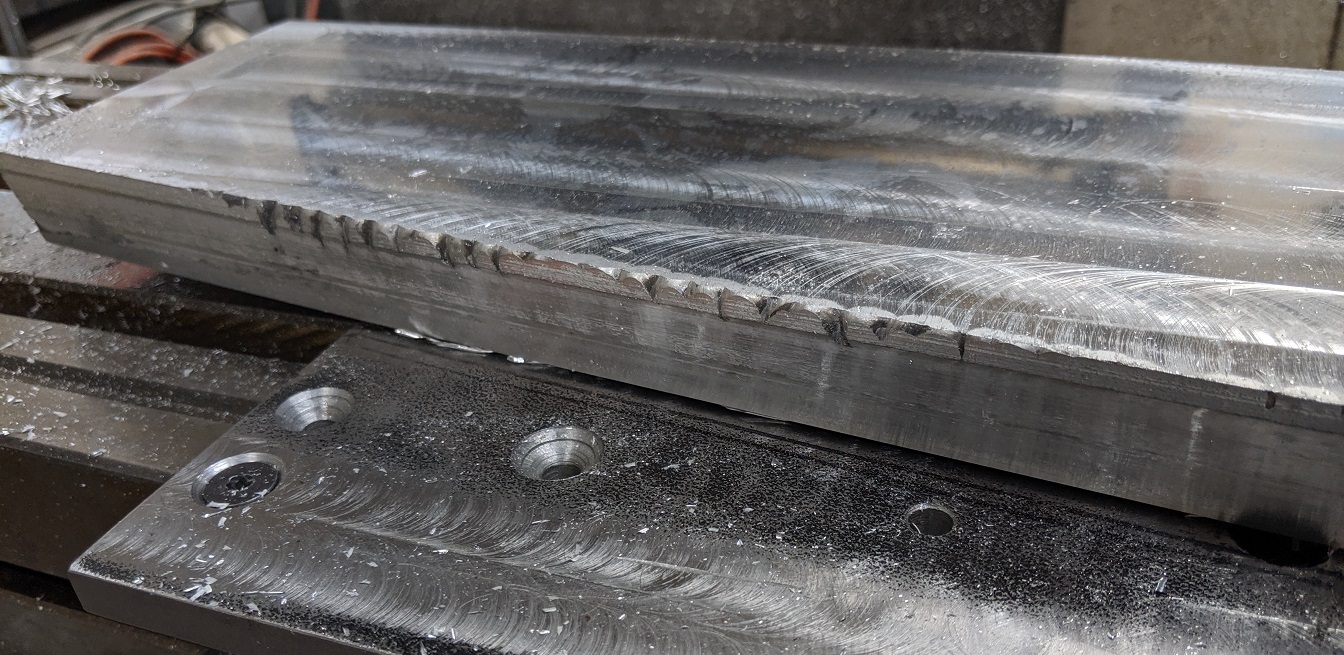
Now, the bad news. With the die mounted in the mill, I did the programming and did a test cut on the profile of the die. To do this test cut, I set the cut depth to zero and run the profile program. The cutting tool drops to the top of the part and then moves around the outside profile of the part. When I did this for the die, I found out that I ruff-cut these dies too small!!! Ugh!! More frustration!!
After making a few adjustments and running the program a few times I determined that one die was only too small along approximately 14 inches of the bottom curve. You can see it here:
Then, buy placing the other die on top of the one that I mounted, I found that the 2nd die was a little too short on the overall length by about 1/16" and that it was also too small on the bottom curve along about 16" near at the narrow end. I marked approx how much material needed to be added (see markings in the pic above) to these places. I took them over to buddy who is going to add aluminum weld to these dies for me while I'm on the road for the next several days. Next time I'm in the shop, I should get these dies cut out successfully. More to follow.
Non-Prowler Stuff:
4. AirVenture 2019 - For me, this year, AirVenture started the week prior to opening Monday. I headed back to WI a week early between work trips to get my RV and move it down to Camp Scholler. I wanted to get my/our campsite set up prior to my final work trip for the month of Jul. That way, once I was done with my last trip, I would be able to head back to OSH for the start of AirVenture and not have to worry about getting all set up. Turns out, that was a good call as the weather on Sat prior to AirVenture was crazy and definitely hindered the beginning of the show this year. It was well worth the cost of an extra few days to know that the rig would be all set up and waiting for me.
You might recall that last winter my dad's RV got crushed under a collapsed building that got a huge snow load from the harsh weather last winter. While his RV was out of commission, I offered my RV to him to stay in at his sawmill this season. He did use it until I needed it for AirVenture. So, the first thing we had to do was get up to his sawmill where he works in the summer months and unhook my RV from the parking spot where his RV normally is and pull it out of the way. Here is my RV after we got it moved out of the way:

Then, we were able to drop my rig and move his RV back into its normal parking spot and get it hooked up. Here is his rig moved back in it's spot and all hooked up again:
Then, the following day, we pulled my RV down to Camp Scholler and got it set up in my favorite parking spot under the big Oak tree:
Notice how empty Camp Scholler is on the Tues before AirVenture begins!! It's crazy how quickly the campground fills up as it gets close to the Sun before opening Monday! In the pic above you might also see the stakes and tape I put up to save a spot for Bryan to park his rig next to me too!
With that done, I headed back to work for my last trip of the month. After that trip, I got back to my folks very late on Sat before AirVenture. On that Sat some very strong (65K ft) storms passed through central Wisconsin. When we woke up on Sunday morning (without power), this was how my folks yard looked:
In total, the storm broke the tops out of 2 dozen trees (or more) on my folks property. I spent the most of the day on Sunday clearing broken trees out of the yard and driveway. We finally loaded up and headed to Camp Scholler about 7pm. We (the crew and I) finally got to the RV about 9pm on Sun night. Here is a pic of this year's AirVenture "Crew":
That's yours truly (front right), my daughter Alex behind me, a work friend, Jennifer (front left), and her boyfriend, Taha, behind her. By Monday afternoon, things at Camp Scholler were getting back to normal, except for the several "lakes" that were still standing in many places from all the heavy rain on Sat. Here is a picture of the flight line crowd on Tues afternoon:
That's the north end of the flight line on the left (above) and the south end of the flight line on the right end. Here is a picture of the Brown Arch for 2019:
Here is a 1st time aircraft for me (maybe ever at AirVenture, I'm not sure?). It looks a little like a Spitfire and I little like a Hurricane. It's actually a Fairey Firefly:
Here is the airplane that stole the show this year. It was supposed to be at AirVenture in 2018, but got held up. Well, it was definitely worth the wait!!! Definitely!!!
It's the XP-82 and it is absolutely an incredible aircraft!!
It's stellar, from every angle:
There is an incredible story behind the restoration of this aircraft. It's worth the read.
Please check it out. A simple web search for XP-82 will provide tons of info.
It is as beautiful in flight as it is on the ground:
Here is another fantasist airplane and always a crowd pleaser. It's the Mosquito:
Here is another favorite aircraft of mine. I've seen the Beech Starship many times, but it still grabs my attention every time. This is a Burt Rutan aircraft and there is so much history, mystery and intrigue that is associated with this airplane. Not many folks know that the building techniques and processes that were created by Burt and Scaled Composites to make the Starship actually laid the foundation for the building of every FAA certified composite aircraft EVER made since!!

This next airplane is no exception. It also benefited from processes and techniques learned during the Starship certification. It's the B787 and it's the largest certified aircraft that I'm aware of that is built largely of composites. [The Dreamliner has an airframe comprising nearly 50% carbon fiber reinforced plastic and other composites.] By all accounts (that I've heard from among the commercial pilot group) the B787 is an "evolutionary" step up in commercial aircraft design. This is one of United's B787's that was flown into AirVenture with an all female crew this year on Wed for the Women In Aviation meeting.
The F35 Lightning II flew a bunch this year! And, so did the F22 Raptor. Here's one of the F35's on Boeing Plaza:
Here's a pic of the multiple military aircraft that flew A LOT this year at AirVenture. The F22's and the F35's flew every airshow, every day!!
The active military aircraft and flying at AirVenture this year stood in very stark contrast compared to the years following sequestration. The military burned A LOT of gas this year! By comparison, there was not one single active military aircraft on the field for two years during sequestration. I, for one, am glad their back! And, if anyone ever complains about the sound of fighter jets, please tell them: "It's not noise, it's the sound of FREEDOM!!!"
It was another GREAT show this year. The night airshow was phenomenal. As I have said before, if you can only get to AirVenture for one day - make sure it is a Wed or Sat. The night airshow (and the fireworks display in particular) is worth the price of admission all by itself!!
So, in years past, the fireworks was the finale for the night airshow, and the "wall of fire" was the fireworks finale. This year, the wall of fire was only the beginning of the finale. It's now the "ball of fire" that wraps up the show. Seriously! Check this out:
Wowzer!!!
5. Fixing 5th Wheel RV's - As I mentioned above, over last winter dad's RV got crushed and in May this spring I went to help him dig it out of this mess:
After we got the RV un-buried, we pretty much tore a bunch of stuff apart on the inside to get at everything that we needed to get to so that he could start to fix it. For example, the bed and bedroom had to be pulled apart in order to fix the bump-out rack gear, the landing gear under the front of the RV, and then put in new carpeting. After AirVenture, I had some extra days off before having to get back to work. So, I could stay and help dad get his RV back together so that it would be livable again. The first order of business was to get the bedroom back together. Here is the bed going back together after fixing the bump-out gear (he already had the landing gear fixed and the carpet re-installed):
And, the bedroom all back together:
You may also recall this pic of one of the building trusses that came down square on top of the air conditioner. You can see here how the RV roof was crushed down and pushed down into the living space by the truss and a/c unit:
On the inside, we had to somehow "shove" the roof back up, and then do something to it so that it would stay up and not want to mush back down. To "shove" everything back up into position, we decided to make up and H frame on top of some screw jacks and use them to push the ceiling back up. Here's what we came up with:
Once we got the part of the ceiling that was in front of the hole (towards the front of the RV) pushed back up into position, we cut a heavy oak board to the right size and shape so that it would fit inside of the existing aluminum truss in the roof. Then, we glued and screwed it into place. By doing that, the broken roof truss and ceiling would stay up in position after removing the jacks. Here is what it looked like just before we took the H frame back down:
Then, we repeated the process on the part of the ceiling that was just aft of the hole (towards the back of the RV) and got the heavy oak board glued and screwed into place:
This is how the hole looked after both trusses were pushed back up into position and the roof trusses were reinforced:
Next, we filled the empty space with insulation and then put up a full sheet of luan plywood that we had pre-painted white to match the ceiling:
We left all of that to dry overnight. Then, the next day we went on top of the roof and put a heavy coat of roof tar all around the hole in the roof. Then, we layed down a 3/4" sheet of marine plywood and screwed it down to the roof trusses and all around the perimeter. When that was finished, we covered it all with several coats of white RV roof paint. I don't have any pics of that, but the repair came out great!
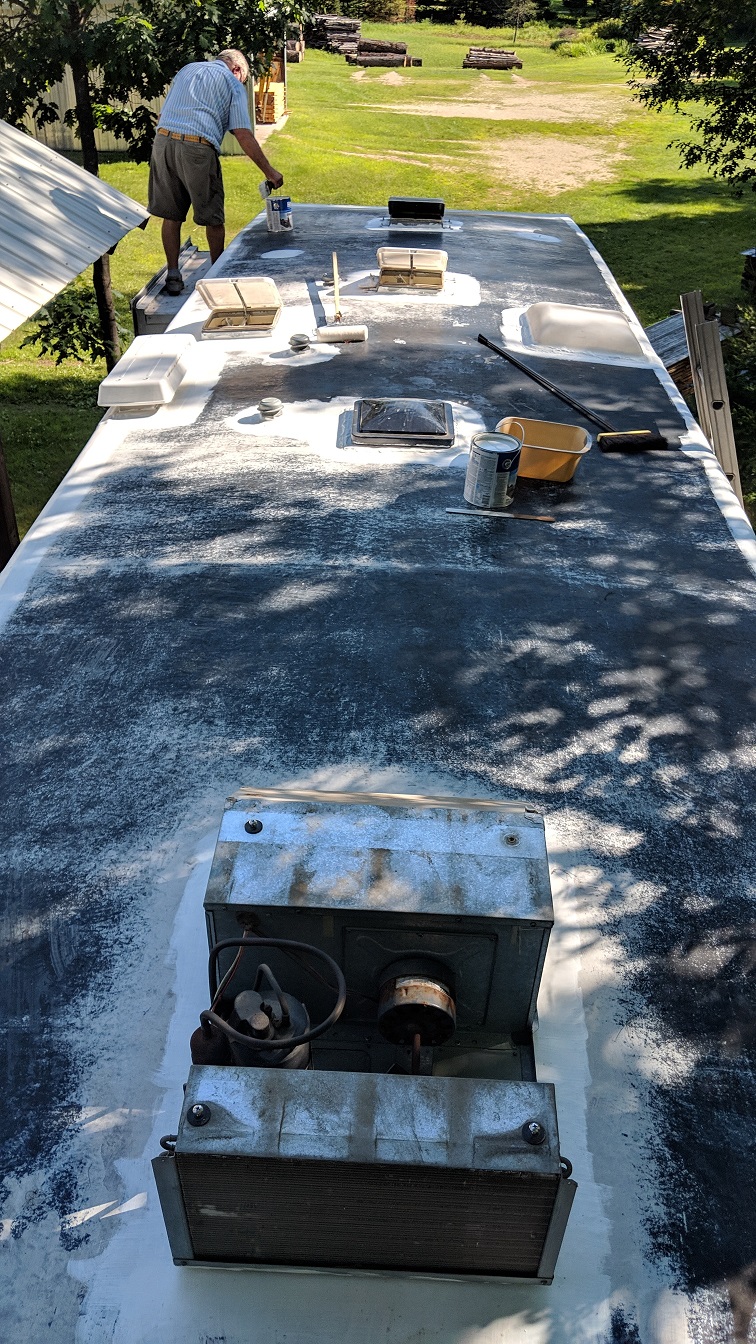
Speaking of white RV roof paint, during AirVenture this year, I climbed up on the roof of my RV and found that there was almost no roof paint left covering my rubber roof. I don't think that it had ever been maintained or re-painted since it was new (20+ years ago). So, while we were working on fixing dad's RV, and when we got tired of looking up, we'd take a break and go up on my rig and look down for a while. The first thing we did with my roof was to remove any covers or fittings that could be taken off and then replaced after painting. Then, we gave the entire roof a good washing and scrubbing to get all the loose junk off of it. Once it was cleaned, here was dad helping me cut in the roof paint around the edges of the roof and all the vents, etc. on the roof:
After we finished cutting in around everything on the roof with 3 coats of paint, I went up and rolled on 3 coats of the while polymer roof paint everywhere else. It came out looking really good!
I removed the cover from the air conditioner to make it easier to paint around the unit. When I did, i found that it was deteriorated pretty bad and broken is several places. I ordered a new one and by now, dad has probably put the new one on. I'm really happy to get this job done. It looks great and the RV will be good to go for AirVenture for years to come now!!
Z. Hardinge CNC Lathe Progress - I had several days off recently and the biggest project that I have that is physically taking up too much room in my shop is this Hardinge CNC lathe. So, I got after it and tried to get as much done as possible.
I have a lot of information with this involved project, so I am only going to hit the highlights here.
One of the main objectives on this project was to move all of the spindle control electrical components out of a huge cabinet and condense them into a much smaller enclosure mounted on the side of the lathe. At this point, that has been completed and the spindle has been tested and works. Here is the new spindle components compartment:
Later, I added a door to the new compartment:
It still needs a handle, some body putty and some paint -but, the door works great.
Another big ticket item to get done was to install a cooling fan in the control cabinet as well as a vent to allow the hot air to escape. Here is the new installed fan:
And, the new vent in the back door of the control:
The Z axis limit switch used to be in a very hard to reach place where it also interfered with other cables and parts of the machine. I moved the switch to this new location and fabricated a rigid actuator that I mounted to the back side of the cross-slide table:
And, the most important modification - a new X axis drive belt pulley installation with a new servo motor mounting plate:
The hardest nut to crack on this project is going to be to figure out how to re-install the 8 position tool turret and, hopefully, make it work again. I'm hoping I can use air pressure and some of the original parts and make it work again so that the turret can be rotated to select various tools and then be locked back down into position after the tool change. Here is what I'm starting with:
And, last, but not least..... Remember that big old huge electrical cabinet? Well, it became a very nice cabinet for storing my Second Amendment devices - after about a week of 10 hr days of work. Here is the cabinet as it was when I got it:
After gutting the cabinet (accomplished while installing the spindle electrical components into the new cabinet), the first step was to grind off the steel bars welded to the back of it:
Cut plugs for over a dozen holes and weld in those plugs, then grind them off as flush as possible:
Clean off over 40 years of gunk off the cabinet inside and out and prime after cleaning:
Also, body putty, sand, and prime all the exposed welded up holes:
Here it is after it was mostly primed and ready to paint:
After painting and installing some of the carpet:
And, finally, the finished product - a cabinet to store my 2nd Amendment devices:
I think it turned out pretty good! Even if I do say so, myself! Ha!
That's it for this update. Thanks for joining me and checking out this update.