Sunday, September 21, 2008

VISIT TO A BUILDER, WING SPAR PROGRESS

The topics of today's post: A visit to a builder; building a drill press bench; and progress on our center wing spar pieces.

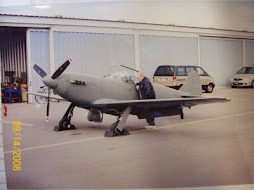
Builder Visit - One day last week while sitting on-call Todd took a trip to visit a another Prowler builder. He went to see Ray who is building one of George's original kits and lives near Thousand Oaks, CA. Ray has been working on his airplane on-and-off for some time now, but the quality of the work is astounding. His precision and attention to every detail is producing the best Prowler we've seen so far. Here is a pic of his airplane fuselage in one of his garages:
The airplane is actually much closer to completion than it looks here. This is because most of the rest of the airplane parts and systems have been completed, fitted, removed from the plane for painting and then stored in one of his many shelves of boxes. He is hoping to finish the re-assembly of all the components to the airplane and have it out of the jig within the next year.

Ray has been already been a wealth of information about this airplane and provided us with much more insight about the aircraft. After talking with him, we found out that another builder has flown his Prowler. Chuck is also a builder of one of George's original kits and is in the San Francisco Bay area. We look forward to getting together with Ray again many more times. Great work Ray!


Center Wing Spar Progress - Now that Dave has a sub-kit to keep him busy in his shop, Todd has had some time to work a little more on the wing in his. If you look back in the posts, it been almost a year since we cut out the pieces for the center wing spar. Hard to believe that this much time has gone by, but now we're making more progress. After cutting with a metal band saw, the edges of all the spar pieces are left with a fairly jagged edge, so they needed to be trimmed up. Here's a pic from last year's post: Also, the pieces were scribed to the pattern and then cut just outside of the scribe lines. This leaves enough material to file down the edges to a smooth finish. Turns out this represents a lot of filing. So, on to a better way.

Sometime after cutting out the spar pieces last year, we mounted a router under one of our building tables and fitted it with a 3 blade, carbide tipped router bit with roller bearing on the end. This provides for a technique to clean up the edges of our spar pieces (raw stock) and make them match the patterns exactly.
Here's how it works:
1) Mount the router and put it in the straight cutting bit;

2) Cut two 1/4" spacer strips for each pattern. One spacer strip goes under the entire stack and provides room to have a counter-sunk bolt head. The other is to provide room between the roller bearing (that rides on the pattern) and the actual cutting part of the bit . This keeps the pattern a good distance from the cutting edges and prevents chewing up he pattern. See pic in item 4 below.
3) Drill selected holes into the raw stock using the pattern/drill guide:
4) bolt the "stack" together and adjust the router depth to get the correct height for the pattern to ride on the roller-bearing: 5) Make a ba-zillion tiny bits of aluminum foil and end up with the whole stack looking like this:
The next item to work on are the bearing blocks. They are rectangular blocks that surround the bearing and are clamped under the wing attach brackets.

Drill Press Bench - A small side project that needed to be done was to create a long bench with a drill press attached for drilling the numerous holes that must be drilled into each wing spar piece. A long bench is need to provide support for these floppy pieces of stock while being drilled. This was the solution we came up with:
By mounting the drill deck (table) under the bench top the drill can just penetrate into the bench top and (most importantly) the head of the drill press is now height adjustable above the bench top buy loosening the drill deck handle and adjusting it.
Make sure to square the head of the drill press to the bench top. We used a tri-square and make adjustments (shims if necessary) to get the press square to the bench top in both directions. It has worked great.
Another side project that is getting more and more necessary is a hardware/parts bin rack. We found an old bread rack dolly for $10 and have begun modifying it for parts bins.

Contacts - Todd and Bryan were supposed to go up to Seattle to meet with Steve who has the 4th flying Prowler this weekend. Unfortunately, scheduling issue came up and we weren't able to coordinate. We are going to try to resked the visit for sometime in Oct.

Thanks for checking in on us.

Wednesday, September 10, 2008

VERTICAL STAB & MORE

Welcome! Or, if you're keeping tabs on us, Welcome Back!

Well, we're managing to get another update done - and it's only been weeks, not months! But, that's because things are happening! Here goes:

Inventory & Parts List - It's taken several months to complete, but we now have a fairly accurate and fairly complete inventory of all the "stuff" we got from George. We have organized this information into a set of Parts List spreadsheets for the airplane. We now have one comprehensive document that contains information about each and every part of the airplane, what its name is, what it's pattern or template is, what it's material specification is, etc., etc. There will be changes, additions and subtractions to this set of documents as we progress, but it is a baseline to start from. Amazingly, this had never been done before, and until now all this information was scattered about in various places - or just didn't exist.

One of the biggest challenges was going through all of the old documentation and finding items that were represented as one part, but were actually made from several different parts and pre-assembled. For example, there is a short shaft that the gear are mounted to. It is "anchored" in the torque box and protrudes through the wing spar. In the old documentation, this was represented as one item. It is actually made from 8 different pieces of raw stock. For production, this information is important to know because it will affect material ordering, etc. Now we will be able to tell exactly how much 4130 (0.063) sheet steel is required for one airplane, for example.

During this process, we also accomplished two additional tasks: 1) matched up any left-over inventory with the patterns that they came from; and 2) divided all the inventory, parts, patterns etc. into seperate boxes (for now) for quick reference. So, we now also have a fairly accturate list of inventory we got from George in the sale and now know where to find it!
Vertical Stabilizer Sub-Kit - Armed with the new spreadsheets, we now have an idea of what inventory items currently exists in each sub-kit and what we will need to fabricate to complete an airplane. The first sub-kit on the list was the vertical stabilizer. Turns out that we had all but about 4 parts we needed to pre-assemble this sub-kit. As mentioned in the website, Todd is the "Production Guy" and Dave is the "Assembly Guy." The vert stab sub-kit has been produced and is now in final assembly. Dave will be doing a major over-haul on the assembly manual as he completes each sub-kit. So, in the end we will have a completely revamped builder's assembly manual.
The parts which needed fabrication included the vert stab skin, a mid-rib, a forward spar and a small angle clip. We used a vacuum bagging technique to fold and crease the skin, a break for the spar parts and the old fashioned "bang it out" technique for the mid-rib.


George came out to help get us started and guide us through the "jigging" process the first time.
Once that was done we drilled the skin and built a crate to ship it to the "Assembly Guy" - Ah, I mean Dave. Now it's on to the fabricatiion and pre-assembly of the horizontal Stabilizer sub-kit next.

Materials For the Plane - Over the past several weeks we have been sifting through the newly created spreadsheets and determining materials that need to be ordered to complete the first two groups of sub-kits. This material has been amassed and is now holding down a bench in the production shop.
This is the steel sheets, steel tubing, bearings, hardware, etc., needed to assemble the Tail Group Sub-Kits and the Wing Group 1 Sub-kits. Hard to believe, or maybe not, that including shipping this pile of stuff represents over $1K worth of materials. In some cases there is enough material to make more than 1 airplane, but some things have to be bought in a minimum order - so that's what ya get.

Contacts - We have contacted a few gents recently that are currently building, or have built a Prowler. In fact, we are going to visit Ray in the Thousand Oaks, CA area to see his project tomorrow (Sunday, Sept 14th). We can't wait, as he sounds like a really nice fellow. We have been very encouraged by some of the information Ray has given us with reference to the airplane, and several folks he's been involved with for the past (nearly) 20 years who know the Prowler and have information about it. We're sure we'll have a lot of info to put into a blog post after meeting with him. Much more to follow.
Also, as mentioned in an earlier post, we have been in contact with Stephen in Seattle area who has a flying Prowler. Bryan and Todd are going to visit with him on the weekend of Sept 20th. This is sure to be a major event in the process of expanding our knowledge of this airplane. Steve is an engineer in the field of airplanes and should have a lot of pertinent information to help us. Much more to follow here as well.
Thanks for stopping by. We'll try to get a post out after meeting the two fellows and tell ya what we found.

Wednesday, August 6, 2008

WOW - HAS IT REALLY BEEN 8 MONTHS!?!?

We received an email the other day from someone wondering if we were still working on this project. Well, the short answer is definitely - YES! For the long answer, keep reading.

OK - let's see if we can account for all the time that has passed without an update.

December to March - Most of this time was consumed by our day jobs. Both Todd & Dave recently moved to new positions and/or aircraft at the day job and a significant portion of our personal time went to completing training, etc. Oh, yeah, Christmas was in there too!

April to May - More of maxing out on the day job to help pay the bills. Most of the rest of available time was devoted to personal projects that needed to be done (stupid honey-do's).

June to Present - Day job is at peak of summer travel season, so guess what!?!? Yep, more of maxing out the day job. However, by taking advantage of as much down-time as possible, we have made a large amount of progress on aspects of "(re)building the company". So, even though we haven't gotten a great deal of work done on "building the airplane" - we have made great headway on understanding the processes involved with producing Prowler parts and then how they are assembled.

We have gone through almost every component of the tail and wing. We've analyzed and cataloged each piece and then considered how to mass produce each one. We've identified many possible simplifications and improvements that we will incorporate into our airplanes. Much of this work was done in collaboration with Bryan (see builder list) and we thank him for sharing his experiences and ideas.

This work will continue with the fuselage parts in the weeks ahead, but it's a pretty time consuming and intensive process. Also, since Bryan has not yet started his fuselage, we don't have the benefit of his experiences - so most things become more of a "what if" discussion.

All of this has an important purpose, and we'll keep most of this to ourselves for now - but suffice it to say that there is "solid" "works" in the Prowler's future.
We also managed to get a few days in at AirVenture 2008.

A Few More Highlights -

Bryan's Airplane: Bryan is making very good progress on his Prowler. He recently had a Tech Counselor review his work in preparation for closing up his wing. Here is a write-up that was published on his EAA Chapter's website:

http://www.eaa182.org/Brag%20Book%20Photos/Prowler/Prowlerproject.htm

Here is a pic of his wing (Top):

Here is a pic of his wing (Bottom):

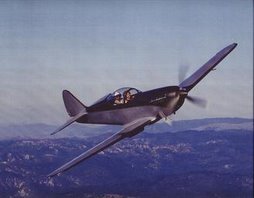
Steve's Prowler - We've had some great email exchanges with Steve and look forward to more. We will be attempting to learn as much about Prowlers as we can with Steve's help. You might say that he is fairly skilled in the trade of engineering aircraft so we look forward to marveling at his insight. Here's a GREAT pic from his airplane's maiden flight:

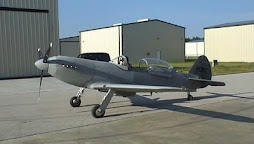
George's Airplane Move - George has decided to move out of his hangar. So, we offered him storage in one of our sheds. Here are a few pics of "move-in day."

Here is a video of an engine maintenance run 5 weeks later:


This video was taken with a digital camera instead of a video camera, so you can see the camera "strobing" the prop. The prop is actually turnng around 1000-1200 rpm. You can see dust swirls as George cycles the prop. Believe us, there is a LOT of air moving behind that prop!

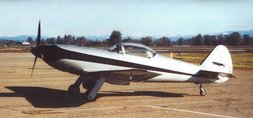
BTW - This airplane is FOR SALE. If you are interested, please send an email on the Contact Page of our website and we will put you in touch with George. Since it is George's personal aircraft, we will not even try to answer any questions about the airplane. We're sure that you'll understand why we say that for all of our sakes - "You'll have to talk to him." We will put you in contact with him.

The Look Ahead - Well, the busy summer travel season is drawing to a close and Sept is usually a slow month in the airline business. So, we will endeavor to get a few things done around the shop. We did get hardware at AirVenture this year to bolt and rivet the center section main wing spar together, so that is next on the agenda. We are also going to endeavor to assemble the Vert. Stab. Sub-Kit and "ship" it out to ourselves for assembly. Dave will be working on that in Fla. while Todd works on the wing spars in Cal. Of course, there is always more part cataloging of the fuselage to help keep "free time" to a bare minimum. Oh, yeah, did I ever mention 3 great kids.......

That's all the news for now. Thanks for stopping by to check out our blog. We'll try get back to making this a more regular event.

Thursday, November 15, 2007

ORGANIZATION AND A HUMBLE BEGINING!!!!

This (pic) has really helped with the organization. These shelves are full of all the rudder, elevator, horz & vert stab, and some fuselage patterns. There are also some misc engine parts, gear parts, etc. but that will be sorted out as time goes by.

Here is a set of rolling shelves that were built to hold all of our hydraulic press patterns. These male/female dies are for pressing out bulkhead, wing rib, and some fuselage parts. The press is just on the other side of the wall to the right. Should be handy access for these heavy pieces.

WELL - FINALLY!!!! This is the humble start to our first Prowler. This is the first piece we cut from our heavy aluminum sheets. It's the center wing section main spar web. The jig saws all went south on us and they were slow anyway. I found the recip saw to be faster and easier to control and not drag shavings along to scratch the stock. It's still the HARD way to do this!

BTW - that's the "Old Master" back at it again. George just turned 80 years old recently. Wow.

This is the "somewhat" easier way to cut out all the spar pieces. We used George's metal band saw. It's somewhat easier, but it's becoming clear that there is no really "easy" way to cut this stuff quickly and practically (unless you have millions of $$ for the CNC 5' X 12' router tables).
This is laying out the fly cut for the torque tube hole in the end of the spar web. The torque tube for the gear will pass thru a bearing in this hole to support the top of the gear strut.

And... The fly cuts.

Here is the semi finished product.

What this makes is essentially an aluminum I-beam. The several laminations of strips at the top and bottom create the "flanges" and the shear web will hold it all together. When positive G's go on the wing, the top spar cap "flange" goes into compression and the bottom spar cap goes into tension. Negative G's have the oppisite effect. The whole assembly provides for the attachement of all the other wing components and gives the wing it's ultimate strength. Right now, all the pieces have rough sawed edges and must be clamped to spacer blocks and the original patterns. This assembly is then passed by a router that will clean up the edges and make the pieces all precisely the same as the original pattern. That will be the topic for the next post. Thanks for stopping by.

Saturday, September 29, 2007

LATEST FROM PROWLER AVIATION

Well, it may not be readily apparent, but there has been a lot going on here at Prowler Aviation the past 6-8 weeks.
FIRST - HAPPY BIRTHDAYS! September 2007 is the end of our second year as the new Prowler Aviation. We have made our last payment to George and now truly own the company. September also saw a big milestone for George. He celebrated his 80th birthday this past month with his family in Santa Cruz. Happy Birthday George!
SECOND - DAY JOBS! Both Dave and I are looking at upcoming training at work. Dave is currently in upgrade training for the A320 and I will be transitioning to the A320 sometime in December. We've both been working a lot in a effort to keep this project funded.
THIRD - SET-UP AND ORGANIZATION. The shop has been getting some final touches to get ready for building our first aircraft. I added several sections of base cabinets and a counter top for "clean" work and a double tub laundry sink for clean up.

I also have building lots of shelves and other organizational storage places. In this pic you can see the shelves for hand tools between the garage doors. There are more just out of sight in this pic. Also note the wing jig off to the right side of the pic.

I also fashioned together an aluminum storage rack that also doubles as a pattern holder for all the wing spar patterns and drill jigs. Here you can see where the 4' x 12' sheets stand vertically in the storage cart.

And here you can see the storage for the wing spar patterns and jigs.

FOURTH - ALUMINUM IS ON THE WAY! We have ordered all the aluminum we will need to build the first Prowler. We actually thought we got the first part of our shipments on Sept 25th.

Turns out this was actually a shipment of stainless steel that was destined for a company in Germantown, WI. A transposing of the last two numbers of a work order number caused it to end up at the shop by accident. It was pretty stuff, but stainless tends to make for very heavy airplanes!It has since been re-packed and delivered back to the trucking company. Our 3 deliveries will all be picked up on Oct 2nd. Wing spar building will begin soon.

Saturday, August 11, 2007

AirVenture and Prowler Nite

Well, it was another great year at AirVenture 2007. The weather didn't always cooperate, but everyone made the best of it. Got to see a lot of incredible airplanes. Some of the notable ones were: Cabi's U2, Ruff Stuff (P-38), Glacier Girl (P-38), Big Bossman (F7F), and many others.


Unfortunatley, no Prowler's were present - YET! Maybe next year!?! We did, however, sponsor an unoffical "Prowler Nite" at the Camp Scholler campground. Bryan Davies and I were able to set up his RV and our camper side by side. In the space in between, we had a cookout and invited Prowler folks, friends and family on Wed nite.


We had a great time meeting all of you and talking Prowlers for the evening.


Thanks to all of you that were able to attend. We look forward to more get-togethers in the future.

Sunday, July 15, 2007

Prowler Shop Gets Even Cooler!


During my last few days off of work I was able to spend 2 days camping in the Lassen National Forest with the family, and 3+ days doing the final assembly of an evaporative cooling unit for the shop.
-
Since the days are now regularly in the high 90's and low 100's, it's become somewhat of a priority to get some cool air into the shop.
-
It's taken a while (note the date of the first pic) since I started welding together the frame for holding up the unit to the side of the building.
But the results were worth the wait. I had a few minor setbacks during the project, but was able to find workable solutions around the issues.
_
Here you can see the hole for the air to enter the building. I would have liked to take out the studs, but since I didn't originally expect to mount the cooler here, the structure wouldn't support the weight of the unit if I took them out - at least not without a lot of re-building of the wall.
-
So the studs stayed, but with little sheet metal leading edges mounted to the front side of the studs (gotta think areodyamics!). In the end, it doesn't affect the flow much at all.
-

Also, to distrubute the weight of the system there is a 3"x3"x12' angle iron on the inside of the building lagged into each stud and the window headers above the windows. There are four 3/8" allthreads that carry the load from the outside into that angle iron on the inside. And the stand on the outside is lagged into the studs at serval places.
-
As I test ran the system the first time, the shop cooled to 78F with an outside air temp of 98-99F. So the math and science of this swamp cooler thing really does work! (see previous post).
-
So, here it is pretty much complete. I need to tack the small supply line and bleeder lines to the wall and paint them to match the outside. Then it will be complete on the outside.
-
On the inside I only have the unit wired temporarily off of an outlet. I still need to run a new circuit off of the circuit panel, but that will wait until after AirVenture.
-