Hello Everyone,
Merry Christmas from Prowler Aviation. I had every ambition to get more blog updates done this year - but, before I knew it, the end of the year arrived and I wasn't able to get nearly as much done as I'd hoped.
The closest thing I have to a Christmas themed picture this year is from a recent BOS to LAX trip. We crossed the Rockies just south of DEN after a recent snow "event". I got a pretty good picture of the new snow on the Rockies:
Those folks know about snow! They know how to deal with it and how to have fun with it!
Well, to wrap-up 2019 for Prowler Aviation I only have the following few items:
1. Making A Set Of Cockpit Floor Stringer
2. An "Artsy" and Creative Prowler Project
3. One Builder Update from Francis
Before I get started with the update, I wanted to rant a little and then do some follow-up on a project that I completed a few years ago. By now, many of you may have heard on the news about the power outages in CA. Well, that would be us! This fall, we had 4 of what PG&E calls "PSPS's" - that would be "Public Safety Power Shutoffs". I call them ridiculous and a result of decades of corruption at (and between) PG&E, CPUC, and the State of CA. For decades the profits have been sucked off of PG&E to pay huge bonuses and to pay off politicians and CPUC members. Nothing was ever put back into maintaining the infrastructure. Now, all the towers, wires and poles are falling down any time the wind blows and the customers are left to pay the cost - again. Soon, we will all have to endure significant rate increases to pay for infrastructure "upgrades." Just watch, in the near future, Gov. Nuisance will let PG&E off the hook and they will be allowed to charge significant rate increases. (So glad I bought a solar system!) That money should have come from properly managed maintenance funds over the past 4 decades, but instead went to myriad corrupt causes. OK, rant over.
Anyway, I am (now) really, really happy that I committed to spent the time, money and effort to build the backup diesel generator that I've mentioned several times in this blog. This is what it currently looks like installed in the "Gen Shack":
I never really thought that I'd be using this to keep us up and running when PG&E repeatedly fails so miserably. All I ever had in mind was having this system available for the family during the occasional power outages that happen when you live in a rural area. In particular, I wanted a system that the girls could run when I was gone on trips and not at home (sometimes for weeks).
Overall, it has worked flawlessly and provided us with great, perfect power during all of these PSPS's (most have lasted 2.5 - 3 days). Over the course of the past year, I've figured out that it burns about 1/2 gal of diesel fuel per hour and costs about $25 per day to run it. We usually run it from 5:30am until about 10:30pm and turn it off at night. At $25/day it is fairly expensive to run the gen, but it is worth it compared to the alternative of no power for 3 days! Between the week long power outage we had in Feb 2019 and these PSPS's this fall, this generator has REALLY earned it's keep!
On a related note (dry, windy, wildfire conditions), we finally got our winter rains in the CA north state during the 1st week of Dec. It's a great thing! All through Nov everything was crispy dry - everywhere! Even the animals were getting desperate for water. We had a lot of wildlife coming to the watering hole in the back yard:
The wildfire danger was really high and we had already had several close calls this past summer and fall. One particular fire, the Red Bank fire, started in early Sep from a dry lightning strike just west of Red Bluff, CA about 1130am. By midnight (roughly 12 hrs later) the fire had consumed 6,000 acres!! Fortunately, the winds died down the next day and CalFire was able to get control of it by the 3rd day at about 9,500 acres. But, it could have been much worse and our home and the shop would have likely been in the path of that fire - had they not gotten control of it.
All of this has gotten me to thinking more about wildfire prevention at home and helping to protect my house and shop. I have a few areas on my property that I never got around to clearing off the brush and undergrowth. They are mostly on the north side of the house and the shop. If we ever did have a wildfire come through our place, it would most likely approach out of the north. So, after this past fire season, I decided to clean up these parts of the property. I had a good block of days off before the Xmas trip that I'm on right now. So, I got busy with cutting, clearing and burning off the brush.
All in - I spend about 4 days on this effort.
CalFire recommends cutting tree limbs off from the ground to 8 ft up,
and then, cut and burn anything that is dead or anything that is laying
on the ground. Turns out, that is a lot of stuff!! But, by doing this,
you help prevent the spread of fire from embers landing in dry grass and propagating into the trees. And, if there is a fire, the CalFire
crews can get through the area much easier to do their thing and fight
the fires. It makes the property more "defensible" in case of a
wildfire - and CalFire is more likely going to be able to save the
structures (home and shop). Here is one burn pile (out of 6) that I got going while it was raining one day recently:

As I sat and watched these piles burn, it seemed odd to me that now it was no big deal - but, had I started a fire like this just 3 weeks earlier it would likely have burned down 1/2 of Tehama County!! However, now I can safely contribute to global warming, and my property will be better prepared for wildfire season next summer. Glad to have this done!
On with the update.
1. Making A Set Of Cockpit Floor Stringers - My new focus here in the shop is to try to get all of the parts fabricated that I need to complete Kit #18 that is inhabiting my shop office. I hope to get this kit sold in 2020. The next set of parts on the list was the floor stringers under the aft part of the cockpit floor. For reference, here is a pic of the under side of the Prowler showing the placement of these floor stringers:
In the last update, I posted about mounting and fixturing these dies in the mill to prepare for machining them. But, then I determined that somehow I had cut the stock for these dies too small. (BTW - I figured out why I cut these die stock piece too small. I used the old part pattern to mark them for ruff cutting. The new parts are a bit larger because all the builders were having to cut shims to fill between these old parts and the skin. After seeing the work Ray had to go through to make the old parts work, I corrected the sizes/shapes of them and they should fit much nicer in the future).
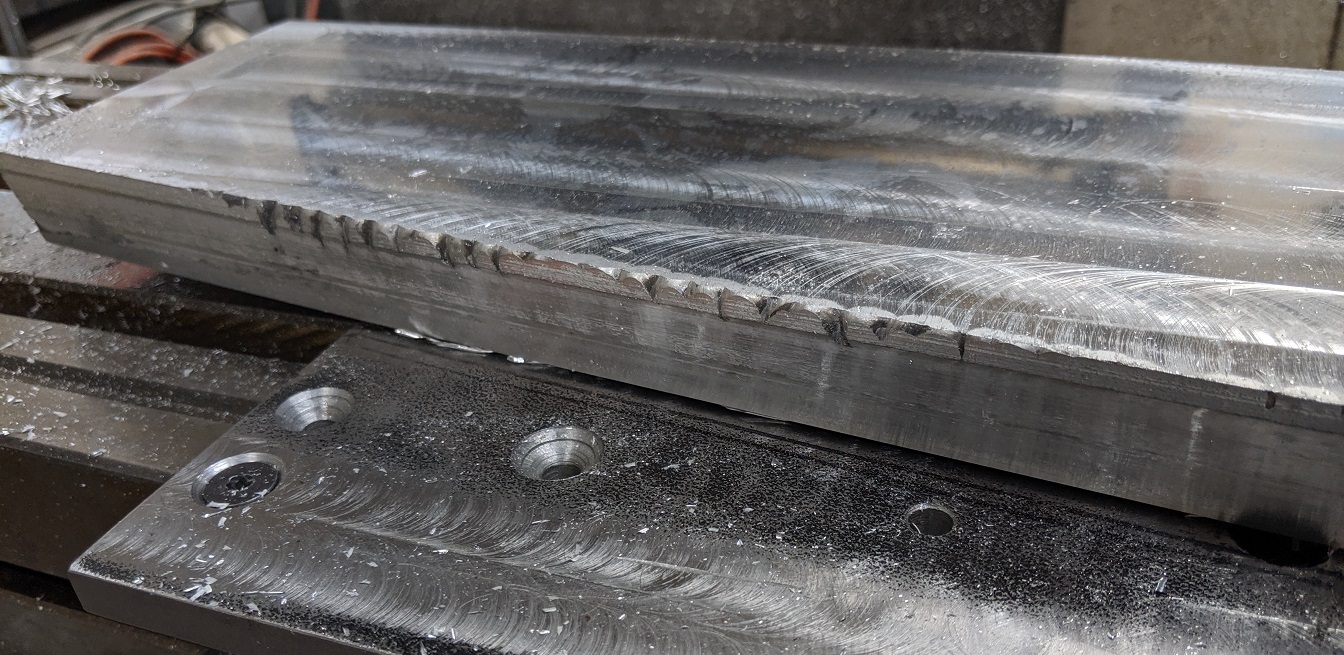
I took these die stock pieces over to a buddy who added some aluminum weld to them in the areas where they needed it. Here is one of them with the added weld:
Here is that die stock mounted to the fixture plate:
Here is the whole assembly back in the mill and after I'd centered it up and taken the 1st ruff cut around the die:
After the face cut and the 2nd ruff cut you can see that the welded area really helped fill in the needed material. But, it was still looking like it was going to be too small in that area. Yikes!!
Here is the die after the 3rd profile cut. Just the very top edge was looking too small:
Finally, after the round over cut there was only a few small voids that were still showing:
Fortunately, these voids are not big enough to affect the part while pressing (these
voids are too small for the aluminum to flow into when under pressure). I might still take them to my buddy had have him TIG a little weld into these areas. Then, I'll just file them all flush with a good file. Here is the die with all the profile work completed:
The last step was to cut in the pockets for forming the flanges on the lightening holes. Here is cutting the 3rd pocket:
This is cutting the largest of the 4 pockets:
Once the die was out of the mill, I had to file down all the sharp edges and break the sharp corners, especially on the pockets (to make sure that the bends on the lightening hole flanges are not too sharp):
The 1st of the two floor stinger dies completed:
At this point, I held up on cutting the 2nd die. This was because I have not yet made a part with lightening holes or formed the flanges for them. I came up with an educated guess to make the pockets for forming the flanges 3/16" deep and then leave a flange length of 1/4". In other words, the pockets cut into the die are 3/16" deep and 1/2" diameter larger than the actual lightening hole in the blanks. I wanted to test this recipe before I cut the other die. That way if it didn't work well, I'd only have to try to fix one of the dies - instead of both of them.
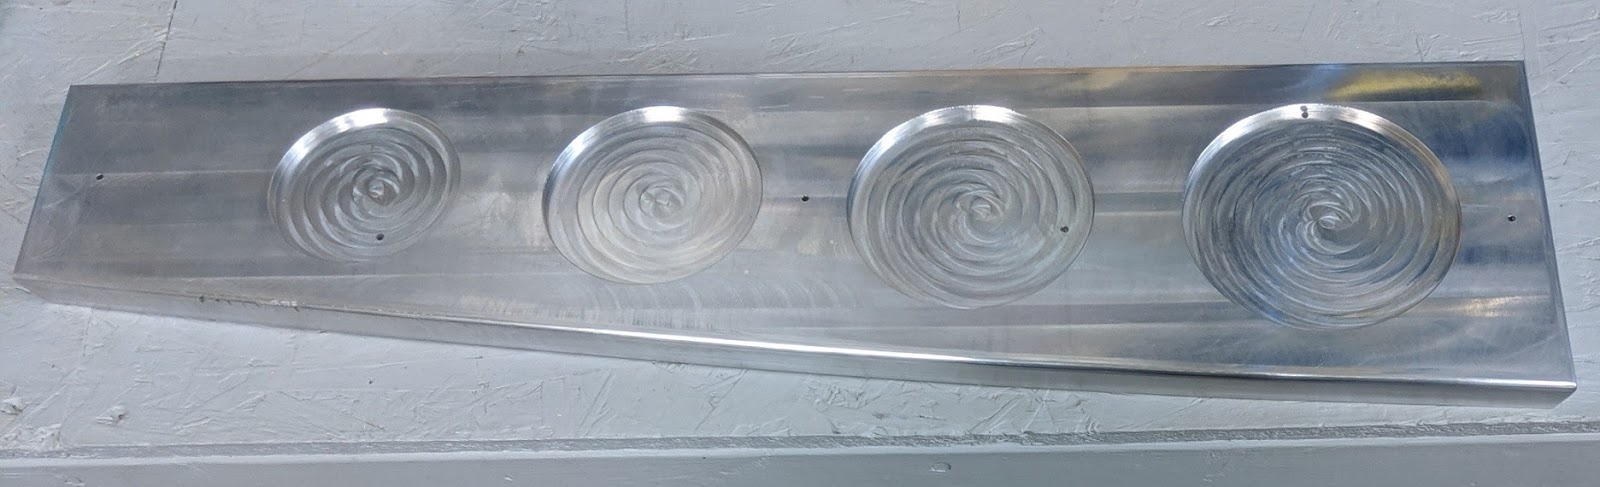
Next, I had to fire up the router and cut some blanks for forming over the dies. That took the better part of a day - I ran into several obstacles and had to re-CAM each of the cut files for the router control. Once I got that done, I grabbed the die and pressed the part. It came out awesome! Here is the formed part and the die below it:
I was really happy with how this part turned out. Here is the inside of the part:
And the top side of the part with the tabbed edge along the bottom:
Satisfied with the lightening hole flanges (and totally satisfied with the part as a whole), I got right on cutting the matching die for the other part. Here it is mounted in the mill:
This die also came out with one area that had a void from the weld that my buddy added to the stock. Turns out, it is in an area that doesn't have a flange anyway - so no problem:
Here is the completed die:
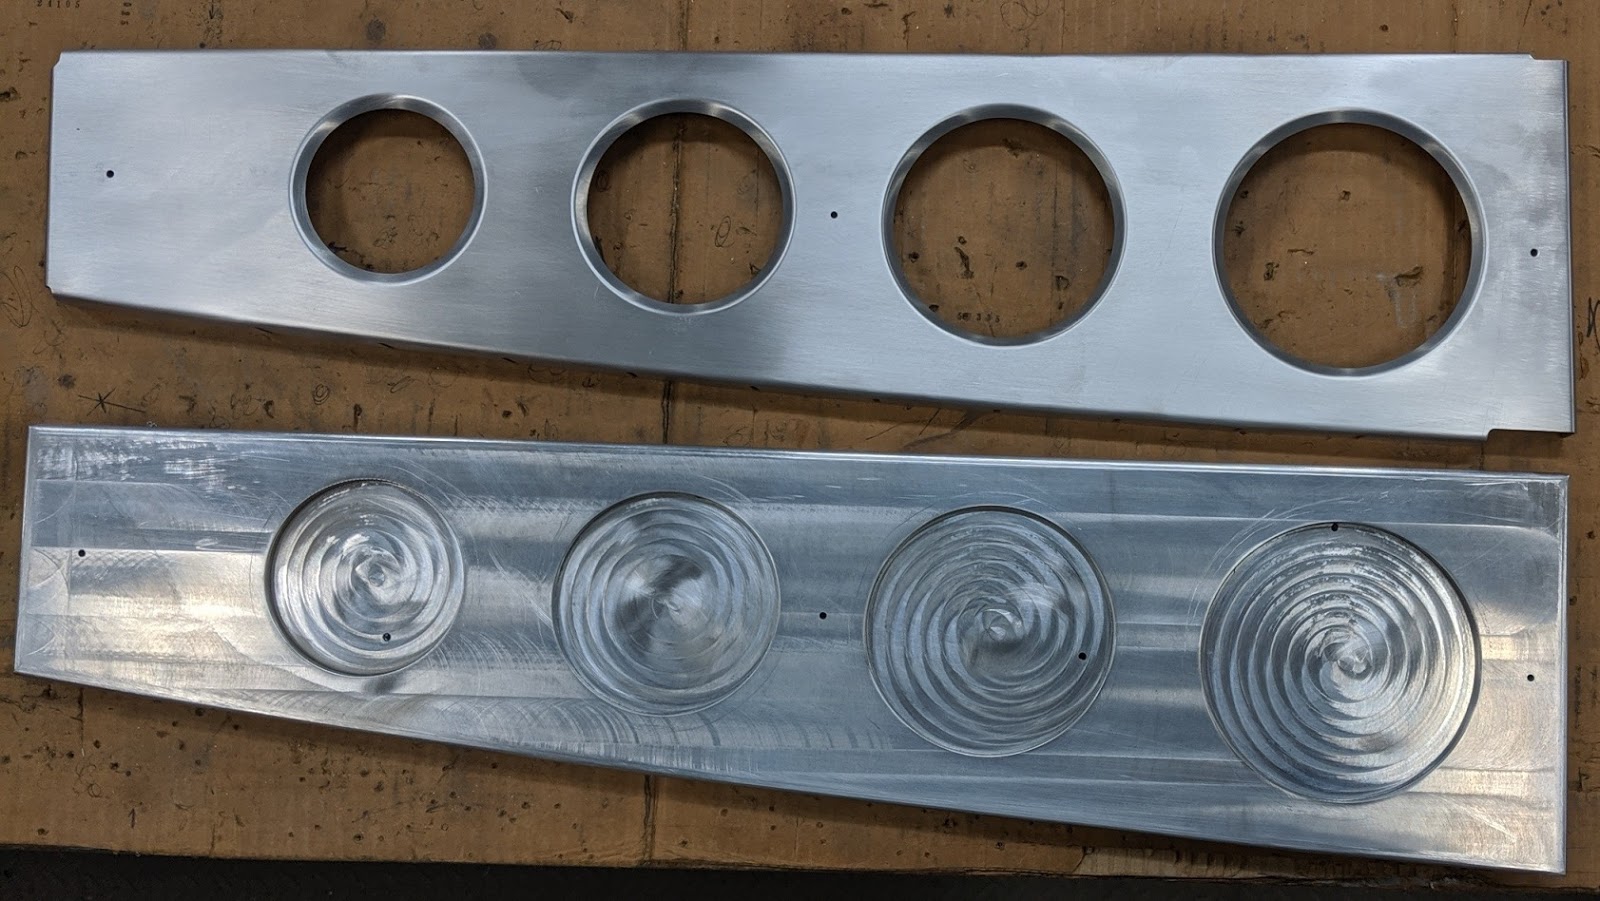
Within minutes of completing the 2nd die, I grabbed the other blank cut from the router and pressed the matching part. Here are the dies on the left and the set of these parts on the right:
Here are the two parts (sort-of) oriented as the would be when mounted in the airplane:
Another view:
Overall, I am really happy how these parts turned out. I am getting a process down for machining these dies in the mill. I'm also thrilled with how the 400 Ton press is working. It's forming really nice parts. Now, I only have about 300 more dies to make!!
2. An "Artsy" and Creative Prowler Project - After George Morse passed away, I was in contact with his family and they ended up giving me a lot of Prowler related stuff that no one in the family wanted. One of the things I got was a large box full of aircraft and parts drawings. At some point, I went through all the drawings to see what was there. Most of the drawings were Prowler parts that I was already familiar with, but I came across 3 drawings in particular that really intrigued me. I am still not 100% certain what these drawings are. But, I believe that they are all hand-drawn by George and I believe that they are all concept drawings that he did when he was trying to come up with his idea for what eventually became the Prowler aircraft.
This first drawing is large (36" x 44") and is of a tricycle gear aircraft that has a turbo-prop engine in it. At first, it didn't strike me as being anything related to a Prowler - but, after looking more closely, the wing planform and the tail planform (top down) certainly gives the impression to that of a Prowler. The canopy also looks the closest (of the 3 drawings) to what the Prowler eventually included:
This 2nd drawing is 20" x 24" and is of a tail-dragger design with a folding wing and a flat aircraft engine. The wing folding hinge point looks to be very closely located to the wing joint location of the Prowler. The tail looks to be of P-51A design and the cockpit looks almost of a Mooney descent. However, look at the forward swept main landing gear and the engine compartment - those are clearly the silhouette of the front end of a Prowler!
Here is the 3rd drawing. It is 24" x 42" and is also a tricycle design. The tail also has a P-51A look to it as well as the canopy area. The parts of this drawing that I can easily identify as Prowler are the windscreen and everything forward of that, except for the nosewheel landing gear. Look at the engine compartment and you see the George Morse PSRU and motor mount design. The wing tips, wing dihedral and the taper of the forward and trailing edges also indicate Prowler to me:
I could not find any signatures or any other identifying markings on any of these drawings. But, I know that George did enjoy doing technical drawings. I think that these drawings have historical importance with regard to Prowler Aviation and the development of the Prowler aircraft. If any of you have any information or thoughts about these drawings - please send them to me.
I really want to preserve these drawings. So, recently, I got into a creative "mood" and found myself at Hobby Lobby looking for something practical and economical to frame these drawings with. I pretty quickly found an "off the shelf" frame for the 2nd drawing. Here is what it looks like after getting it framed up:
Unfortunately, "off the shelf" frames only go up to about 36" x 40". And, it turns out that getting a custom frame made for something that is 36" x 48" is pretty pricey. At this point, I was not inclined to invest almost a 1/2 day's pay into a frame for the large drawing. So, I set out to find another option. I was cruising thru the area of the store that had painting canvases and saw that they had "build-your-size" frames for making a painting canvas. I bought a set of 38" frame sides and a set of 48" sides ($14). Here they are:
I put them together in a rectangle and glued and nailed the corners. Then, I painted the frame. Next, I cut hardboard triangles and glued and nailed them to the corners to square the frame and stiffen it. Then, I cut down a large piece of foam board ($12) and fit it inside the frame. Here is what that all looked like from the back:
With that done, I placed the drawing in the frame. Then, I found a 48" x 48" piece of acrylic plexiglass at Home Depot ($50) and cut it down to fit inside the frame. The last step was to cut down some screen molding pieces in the table saw to make some glazing strips that would hold the plexiglass in place. I painted them black for some contrast and nailed them into place to hold the plexiglass. Here it is:
The final result turned out pretty nice, I think. I only had to spend about $75 for materials and about 2 hrs or time to make this frame. Sometime in Jan, I'll work on hanging these in the office. I still have to find, or make, a frame for the 3rd drawing. I'll update on that next time.
3. One Builder Update from Francis - I've gotten a couple updates from Francis recently. His first was to let us know that he was working on the many access panels for the wings. Here are his panels after cutting them out:
And, here are his access panel doublers after he did an alodine process on them:
Looks like a great way to separate them and still hold them all together for the alodine process:
Then, just a few days before Xmas, I got an email from Francis telling me that he got his inspection and sign-off (thumbs-up) from OSAC (which I believe is the French form of the FAA). With that, he is now cleared to close up and put skins on his wing. Here is the OSAC stamp of approval on his wing spar:
That's AWESOME, Francis!! Great job!! Looks to me like Francis gave himself an excellent Christmas present this year!! Well done, my friend.
Well, that's all for this update. I hope you all have a safe, enjoyable holiday season and a happy, healthy new year in 2020.


No comments:
Post a Comment