Sunday, December 15, 2024

Dies, Dies and More Dies! [Catch-up Update #1] (Jan-Jul 2024)

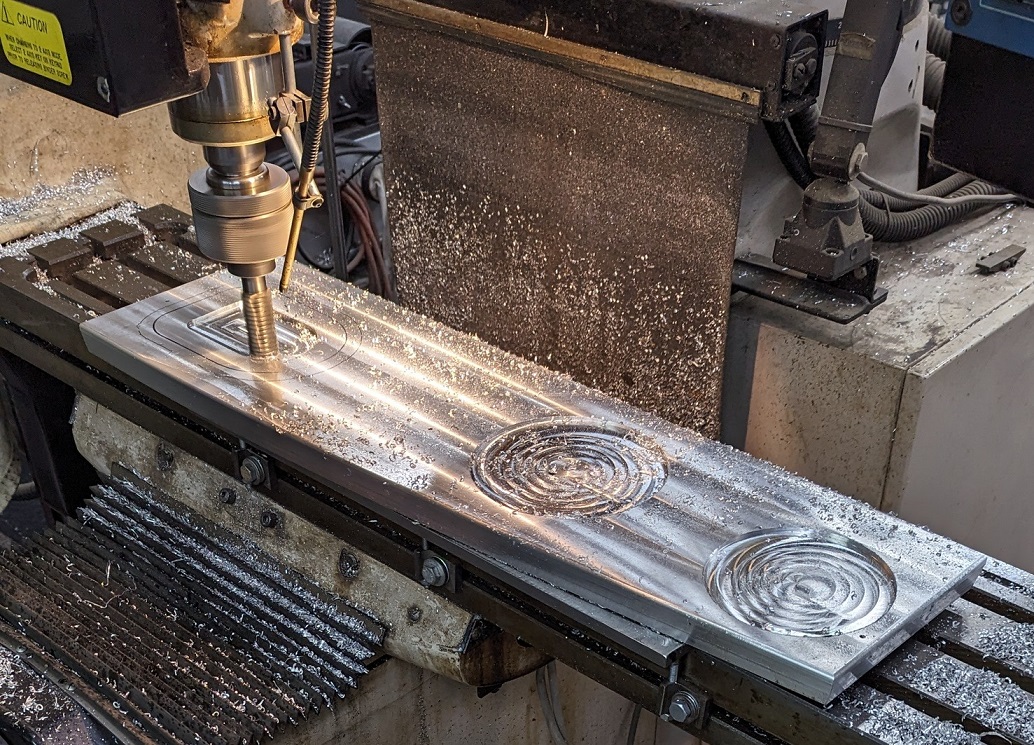
In this update, I decided to only cover the work that I did on making dies to form all the parts of the Prowler wing.  So my die cutting work will be the sole topic on this post.  I also worked on many other projects in conjunction with making these dies - meaning, I started and finished several other projects while still working to complete all of the wing dies.  So, as I mentioned in the previous update, I made a lot of chips this year:
This is how the area around my mill looked every time I worked on making a new die. 

By my count, there are 50 major formed parts that make up the center and outboard wing sections.  And, because each die is undercut by 10 degrees - every formed wing part has to have it's own particular die (form block) for the pressing operation.  (Recall, the under cut allows over-bending on each flange and this is to compensate for the springback of the flanges during the forming process).  So, I have to (had to) cut 50 forming dies - one for each part of the Prowler wing!

However, I have previously fabricated several of these dies.  The first die that I made was to test the 100 Ton press that I put together many years ago.  To test that press, I wanted to start with a part that had a rather small surface area facing the rubber pad.  The part I chose was WCS59. 
That part is one of the three parts that makes up the bulkhead that is aft of the main spar and just forward of the joystick torque tube under the cockpit floor.  [More Info Here - See Item #2]

Later, after completing some tweaks on the 100 Ton press, I fabricated the two wing tip rib dies.  Then, I successfully pressed out a set of tip ribs for the Prowler. 
This was something that I really celebrated and got a lot of satisfaction out of accomplishing! [More Info Here]

In late 2014, Francis needed to have 4 new nose ribs to replace the ones he had not gotten with his kit. 
So, I cut the needed nose rib dies and pressed out those parts for him.  [More Info Here - See Item #1]

In 2019, after I completed the 400 Ton press, I needed to make a part to test it.  I decided to do a set of floor stringers dies (FFA23&24) - for several reasons:  A.  I needed a set of these parts for Kit #18; B. These are some of the largest parts that I need to form to make a Prowler kit and I wanted to see that the press could do it; C. Ray, and others, had made me aware that this part was too short on their kits and needed to be modified; and finally, D.  I knew that Francis was coming to a point where he would need this set of parts and I wanted him to have a good set to put on his airplane. 

So, I checked out my CAD drawings and did a "virual" assembly of all the parts under the cockpit floor.  It was true, that part was too short.  I made the necessary corrections and fabricated a set of dies to make these floor stringers.  [More Info Here - See Item #1]. 
A little later, I made the set for Francis and sent them to him for his Prowler.  In fact, the two younger daughters were home at that time, so I had each one of them take a turn at pressing out one of the two parts:
That almost 5 years ago!  Yikes!!

So, removing these 9 dies from "the list" left me with about 41 dies to cut.  My goal was to get these all finished up before I left the shop this summer to head to WI for AirVenture 2024.  I ended up getting 36 of these dies cut.  Rather than rush to get the remaining 5 dies done, I decided to leave them for this fall when I could take my time and double check a lot of measurements on the CAD drawings and laptop.  I want to get them right the first time and I don't want to have to re-make any of them because I missed a bad or incorrect dimension.   Of the remaining 5 dies, only one will be modestly difficult to make (the aft bulkhead).  The other 4 will be pretty straight forward and fairly quick to make - as they all have straight sides (inter-web bulkheads).  I hope to get these remaining dies cut in the next several weeks.

Back to the beginning of 2024.  I started with a pile of 1" thick aluminum plates that I had previously roughly cut to the required shape and stacked on a dolly.  You may recall these pics from a while ago:
[More Info Here - See Item #3]  As it turns out, I pretty much worked this pile from the top down.  I actually was trying to focus on cutting the longest dies first.  They are the most work and take my mill to the limits of X and Y table motion.  So, I had to be really careful how I fixtured the long dies in the mill so that the machine would not "over travel" the X and Y limits.  With some careful planning (and sometimes sketchy execution) I was able to get them all completed.  Here are several pics of cutting various dies this year - in no particular order:
There were mid-ribs:
Center section nose ribs:

And; here is a combination floor stringer (top) and mid-rib (bottom) in the center section:

Not sure what this is - an outboard mid-rib?:
This is a set of outboard wing mid-ribs:
+++++++++++++++++++++++++++++++++++++++++
SIDEBAR #1

I really only had one major goof while cutting all these dies.  I try to double check every dimension multiple times and I always do a "air cut" on each die before I finally start making chips.  It has all paid off, but sooner or later Murphy catches up to you.  On one of the longer dies, I cut the pockets for the lightening holes in the face a bit too large.  It was for part WCF77.  It's one of the longest dies and I cut the lightening holes with each on 1/2" too large of a diameter.  I know how it happened.  I take the size of the lightening hole and I add 1/4" to the radius to get the size of the pocket to cut.  Well, I ended up adding the 1/4" to the radius twice.  Doh!!

I considered several ways to try to fix the die and there was always the option to just get a new piece of stock and cut the die completely over.  After much consideration, I decided to take it to a local weld shop and have the corners of the pockets have aluminum weld added to them.  This is how the die looked when I got it back from the welder and after I fixtured it back into the mill:
Then, I re-faced the top of the die:
Then, I tried to re-cut the walls of the pockets to the correct depth:
In the end, there were several places where the weld did not fill in completely.  Also, when I removed it from the mill, the die had a lot of warp to it.  I tried to straighten the die and get it flat again.  But, it was warped in 2 directions - which made it hard to do.  In the end, the heat of the welding caused the die to warp quite substantially and it was just not going to come out.  So, I ordered a new stick of 1" x 10" aluminum bar, cut a hunk off and I just re-cut the entire die.  It was a lot more expense and took a lot more time to remake this die.  But, I didn't want to risk having a warped die make warped aircraft parts - so it was worth it to just remake that die.  Here on top is the die that I eventually remade:
END SIDEBAR #1
+++++++++++++++++++++++++++++++++++++++++
SIDEBAR #2

As I was making all of these dies this year, I noticed my undercut tool is getting dull.  I only have this one tool.  It was made by a local (retired) tool and die maker that I found several years ago.  Here is the tool he made me back then:
You can see how it works to make the "undercut" on my dies.  Even though I am only cutting aluminum with this tool (I go to great lengths to make sure I don't accidentally cut a steel screw or dive it into the steel fixture plate.)  Still, if you cut enough of anything, even butter, your tool will wear!  And, this is what I was noticing.

Unfortunately, since JD first made this tool for me, he became a victim on the Carr Fire in 2018 and he lost everything!  His house and shop burned to the concrete slab.  Having already been retired, he decided that he was not going to replace any of his machines and was not going to do any "semi-retired" work any longer.

So, how to get a new cutter?  I searched around and found a few tool and die makers in the Sacramento area.  It was going to be a little bit of a PITA (and stupid expensive) to find a place that cares to do a "one-off" job like this for me.  I searched online for a while and eventually found a tool maker that had a dovetail cutter with the correct angle that I needed:
But, there were two problems with this.  First, it's a carbide cutter - which I really don't need.  HSS (High Speed Steel) is all that is really needed for cutting aluminum at the slower spindle speeds that my machine is capable of.  But, it will work.  Second, the overall cutting length was too short.  I downloaded the cutter specs, fired up my CAD software and here is what I sorted out:
The thing to notice in this pic above is that when the rounded over top edge of the die is touching the shank, it will not undercut the die sufficiently.  It interferes by over .033".  In order to use it, I would have to reduce the shank radius by at least .040".  I ordered the cutter, knowing that I was going to have to grind down the shank.

To reduce the shank diameter, I needed a tool post grinder to put on my lathe - which I did not have.  But, a hundred unfinished projects in the shop is just not enough, so let's add another project and make one!  I foraged around for a while and found an old chain saw sharpening grinder that I gotten in some auction lot and shoved it in the back of a drawer.  This thing:
If this was going to work, I was going to have to cut off the part of the guard outside of the black sharpie line.  Then, I was going to have to replace the pink grinding disc with a oxide disc that will cut carbide. So I ordered one those and cut it down to the size to fit on the grinder:
Next, I was going to need something that I could mount the grinder to that I could then mount to the lathe.  I found an old piece of aluminum plate that I had in "the pile":
After some cutting and cleaning I had this:
I turned down a spacer that would help mount this to the tool post:
And eventually ended up with this:
It took a while to give this "barely capable" tool post grinder to do it's thing.  But, eventually I ended up with what I needed:

This should work.  I will have to cut the undercut on the future dies in two passes, but now this tool will have the shank clearance to do what I need it to do.

END SIDEBAR #2
+++++++++++++++++++++++++++++++++++++++++

When the clock finally ran out this summer and it was time to pack up for the trip to AirVenture, I had 36 of the 41 dies finished.  At that point, I decided to take time and create a photo op that would summarize what I had just spent 7 months working on.  I took all the dies that I had made (and the 5 remaining unfinished blanks) and placed them onto a 12' x 10' tarp in the approximate location of the part that it will make.  Just for reference, the tarp is 12' wide and the longest dies (top center) are over 3' long:

(That set up literally took up all the open floor space I had available on my shop!  I could not have squeezed in one more set of dies along the length of the wing!) 

For purposes of that photo, I included the aft floor stringers and the aft center section bulkhead.  I included them even though they are not actually included wing sub-kits.  (The floor stringers are in the Fuselage Floor sub-kit.)  But, since they all must be used when assembling the main center section of the plane, I included them for completeness.  You really cannot build the center section of the plane without including these formed parts. 

The 5 unfinished dies were also included - four of which are fuel tank bulkheads (placed aft of the outboard wing mid-ribs).  The remaining one is the aft bulkhead that is in the far back right side.  The rest of the dies in the pic above are in the condition that they will be when they are used to make Prowler parts in the future.

Once I finish the 5 remaining dies, the next step will be to go back to the laptop and the CAD software to complete an accurate drawing (and G-code) for each of the blanks that will be pressed over each of these dies.  That will be almost as big of a task as cutting these dies.  As the saying goes, "it's complicated" and there is a lot involved with this.  I will expand on that and discuss it more in a future update(s).  That will do it for this update.  Thanks for checking out this update!  I hope to have another out soon!

Saturday, December 14, 2024

Well - This Year Went By In A Flash!!

 WOW!

I cannot believe that it is Dec 2024 and I haven't published a SINGLE blog update this year - yet!!

It has been a busy year, and I have gotten a lot accomplished.  I have taken (and collected) a bunch of pictures to share with you - I just haven't yet taken the time to sit down and bang out any blog updates.  I find it really hard to sit in front of a computer on a nice weather day and write and create these blog updates, when I could be out in the shop working on something!  Historically, I have done most of the blog updates when I'm on the road working the day job - mostly while sitting in airports or hotel rooms when I don't have much else to do.  If I am home, I would much rather be in the shop getting something accomplished.  So, that's mostly why I have let the blog updates fall behind.  But, now, it's close to the end of the year and I would like to document some of my Prowler Aviation accomplishments this year (and some personal stuff, too!).

I do have the backlog of pictures on my laptop sorted into folders and ready to share with you.  So, over the remainder of 15-something days in Dec, I will endeavor to punch out several "Catch-up" blog updates.  It will probably work best to do this in [somewhat] chronological order.  So, look for updates to come out soon that cover a month, or groups of months from this past year.

In the last blog update, I mentioned that I lost my FAA Medical.  I have a familial history of Afib.  In summer of 2023 I had a few episodes of pretty debilitating tachycardia.
Working with my cardiologist, I found treatment and found an excellent electrophysiologist.  I had ablation surgery in Jan 2024 with a subsequent 3 month recovery period.  In April, I wore a 2 week monitor and then had a final follow-up appointment with my cardiologist in late May.  The surgery was successful and I am off all meds and feeling great!  It took until early August to collect all the reports and data that the FAA required and submit my package to them to request a special issuance 1st class medical (so that I can go back to work).  At the end of Aug they sent a registered letter requesting more tests (Sleep Study) and, now, those have mostly been completed.  The complete results of this follow-on test will get submitted to FAA in Jan 2025 and I will hopefully get cleared to return to work by Mar-Apr 2025.

In the meantime, I have been on a LTD (Long-Term Disability) and using my time to get lots of projects done.  The most important project that I focused on (and worked really hard on) was dies (form blocks) for the Prowler - in particular, the dies to make the parts of the main center section wing and the outboard wings.  I made A LOT of chips this year:
I am happy to report that before I left the shop this year (to head to AirVenture), I managed to get all (but 5) of the dies fabricated that will make all of the parts of the center section and outboard wings!  That will be the topic of the next blog update and I will have more details on this.

To continue with Prowler related news, I have builder updates to share from several builders.  Vaughn has been sending me pics all summer of his engine compartment work:
I also just got several pics from Francis with progress updates from him:
And, Bryan has also recently sent several updates on the status of his Prowler project:
In March I also used the CNC mill to make an adapter plate for Bryan's FWF project (used to match his throttle body flange to his intake flange).  It is the part that is missing from this pic:
I will cover each of these more in an my upcoming updates.

Last year, Bryce & Cabi each loaned me a form block that they had which is used to make the horse collar (forward bulkhead) for the Prowler forward engine compartment.  I used it to make a few of these parts (one for Vaughn and one to have in inventory):
To return the favor(s), I also fabricated a horse collar for Cabi and then returned them to him.  Bryce ended up giving me the formers that he had.  I promised to make him any part he needs in the future to get the RW&B Prowler back together.  I'll cover this a little more in a coming update.

On the Non-Prowler related items, I have gotten quite a few personal/shop projects accomplished this year.  Here's the list:
    1.  Local EAA Chapter helo sim trailer work;
    2.  Rebuilding a Bridgeport Mill 2J Head Rebuild;
    3.  Fabricating a shade frame in front of the shop;
    4.  Rebuilding an 81 year old lathe;
    5.  Oldest daughter's truck work (almost beat me);
    6.  EAA AirVenture 2024;
    7.  New RV storage building.

I will probably group some of these and cover them in some additional future updates (where I can provide a lot more details).  For the balance of this update, however, I would like to do an overview of my year from a "FL350 perspective".  It really has been a busy year!

This year started out with me facing this ablation surgery in the first week of Jan.  The outward recovery from this surgery was very short - just a few days really.  The surgery is all arthroscopic and the incision points heal pretty quickly.  So, I was up and back out in the shop in just a few days.  The longer recovery is for the heart lining that literally gets burned (via either heat or cold) during the ablation.  This damage takes a minimum of 3 months to heal.  In fact, they don't even bother to monitor the heart and check your rhythm for at least 90 days after the procedure, because during this time the heart has a lot of weird stuff going on (palpitations, weird beats, extra beats, etc.).

Anyway, the point of it all is that this recovery time (technically referred to as a "blanking period") made a lot of time available to me that I would normally not have had.  I vowed to myself that I would use this time effectively and not waste a single day of it.  And, I think that I kept my promise to myself, but you can be the judge as you review the forthcoming blog updates.

So, by mid-Jan I was in the shop every day making dies and working to get as many projects moved along as I could.  My folks came out to visit for most of the month of Feb, so, I also had "Pop in the shop" for that month - and he always keeps things moving along!!!  Whenever I know that he will be around, I always try to have some projects teed up to keep us busy.  This year, it was the helo trailer project and the 2J mill head rebuild.

As the calendar flipped over to March, I was almost totally focused on cranking out part dies and painting parts of the LeBlond lathe that I am rebuilding.  You'll see all this in the coming updates.  April brought me a project that nearly beat me into submission.  I tried to help out the oldest daughter by working on her diesel pickup truck that needed repairs (she had gotten $13K estimates for injectors, turbocharger, water pump, fuel pump and other stuff).  This became my world for weeks:
Now, I've done all my own car/truck repairs all my life.  But, these big diesel pickups are something quite different.  That truck hated me, and fought me to the bitter end - for nearly 5 weeks!  But, I can now say that I have successfully replaced that list of stuff above on a 2011-2016 Duramax 6.6L LML diesel.  What a fight!  I got the truck back together and running good just in time to move the middle daughter out of Arcata, CA and up to Kirkland, WA (Seattle).
She graduated from Cal Poly - Humboldt with a BS in Physics (Magna Cum Laude!) and got offered a paid PhD program at the Univ of Wash studying Planetary Science.  Then, I returned the truck to the oldest daughter in Portland (and picked up my truck that I'd loaned to her) on the way home in early June:
Back in the shop in June I was pressing hard to get all the remaining wing dies made before heading out to Wisc for AirVenture in July.  I almost made my goal, but held off on 5 part dies that needed a fair amount of CAD work to make sure that they were the correct size, etc.  I didn't want to rush to get these done, only to find out that I made them the wrong size and would have to re-make them.  In the end, I made about 40 part dies between Jan and early July this year - one of them I had to make twice after I made and unrecoverable goof on it.  So, call it 41 dies!

On July 9th, I loaded up an old 1999 Ford Windstar van I have and headed out to WI.


Normally I can make the drive to WI in 3 days and 2 nights.  This time, a had an extra stop in Billings, MT to spend a night with my sister and brother-in-law. So, this trip was 4 days and 3 nights.  I got to the property in WI and spent just a few short days getting things ready for AirVenture.  Then, I loaded up and moved everything to Camp Scholler on Tuesday prior to the start of the show (and to meet up with Bryan):
AirVenture 2024 was great!  It was generally excellent weather.  My crew was a little thin this year - only 2 of the girls were able to make it for just a couple days.  But, Bryan had nearly his whole family there including grand-kids - so, we still had a large showing this year!  Just look at this guy:
I was the last to leave Camp Scholler this year on the Wed after the show:
August was dedicated to helping my folks around their home.  My mom was planning on a visit from a former foreign exchange student from Denmark.  My parents hosted her many years ago and they have also gone to Denmark several times to visit her and her family.  Bodil was bringing her whole family and mom began planning a get-together that ended up turning into a large party.  Then, that ended up turning into an "almost" family reunion when it also became my mother's 80th birthday party.  I helped out during the first half of Aug by cleaning, power washing, painting and prepping around their house.  Then, we all spent the last two weeks of Aug enjoying their company and having the party.
After a few days of recovering from a busy August, I decided in early Sep that this was the year to build a new building on my property in WI.  I wanted/needed an addition to my current pole barn to store my 5th wheel RV inside of.  My RV has been sitting out in the weather for many years now, and I decided that it was time to change that.  The short story here is that I (with the help of a few friends) poured the slab on Sep 20th and on Nov 20th I put up the last of the interior insulation and sheathing.  I put the RV inside of the new building on Nov 22nd, then spent two days cleaning, organizing and winterizing.  On Nov 24th I drove out of WI headed to Seattle to meet the girls for Thanksgiving:
We had T-day together in Seattle this year:
I finally got back home on Dec 1st.  I've been home about a week now, and I think that I am already overwhelmed by all the unfinished projects that I left here when I drove away in July!  Ugh!!  But, I've already started cranking again!  The truck is unloaded and most everything put away.  I've downloaded and sorted a couple hundred pics of this summer's activities and started this blog update.  I've finished a few welding projects and I've started stripping down the headstock on the LeBlond Regal lathe that I am rebuilding so that I can get it repainted ASAP:
I have to get that lathe rebuilding project done!  Oh, and of course, we got the Xmas tree today!

So, yeah, it's been a busy year.  But, I have also gotten a lot of projects accomplished.  I will highlight a lot of it in the coming blog updates.  Come back and read about them, soon!  Thanks!