Monday, December 16, 2024
2024 Builder Updates [Catch-up Update #2]
In this update, I decided to group all of the builder updates together. Throughout this past year, Vaughn, Francis and Bryan have provided me with many updates on their projects with words, pictures and videos. In this update I will try to recap, summarize and present the status of each of their projects. Let's get started:
Vaughn - Kit#13: Late last year, I made a horse collar and longerons for Vaughn as he started to make plans to complete the engine compartment on his Prowler. He had also purchased a set of engine mounts from Bryce a while back. With all these parts, he was ready to begin work on the engine compartment framing. Here are some pics he sent me:
He is planning to install a modified Mazda rotary engine in his plane. That engine is significantly lighter than the typical V8 package. Because of this, Vaughn has stretched his engine compartment and had to get inventive in a quest to manage the weight & balance of his airplane. Including this:
Yes! That's a steel plate formed into a bracket that helps extend the horse collar far enough forward to and adds a bit more weight farther forward. There's more he will need to do, but every bit helps! Here is his initial framing clamped up:And, later, cleco'ed together:
As a side project, he has been forming his own canopy frame for the airplane. .
He has most of the frame together, but he has not been able to successfully form the aft frame piece. The radius is so tight that the tubing ends up kinking or failing before he can get it formed. He also has made a much larger access panel for his tailwheel compartment so that he can get in to work on the tailwheel parts and linkages much easier:
Most recently, he has started to teach himself how to run the English wheel. Below, you can see his first two panels for the engine compartment being worked on in front of the English wheel:
As his skills with the English wheel improved, he moved on to forming more of the larger panels in the engine compartment.
It is looking really good!
As he learned more about using the English wheel and working with the aluminum skin sheets, he other parts of the plane. Here is a look at the MLG follow-up doors and work on the wheel wells:
Here's the other side:
Now, he has gotten better with the metal forming, he has made some sections of his wing root to fuselage wing fairing panels. Those look excellent!
Here are the most recent pics of his engine compartment panels:
Excellent work, Vaughn! I know that we have talked about the learning curve for forming these skin panels. It really looks to me like you are conquering that beast! Well done! Keep up the great work, Vaughn!
Francis - Kit#11: I believe the year started with Francis working on his MLG follow up doors and wheel wells. I think I sent Francis the pattern for making this bracket that ties together the wing inner nose rib, the leading edge skin and the firewall. Here is one of his installed:These pics show Francis working on the position and alignment of the MLG follow-up doors in the gear up position:
And, in the gear down position:
Here is a video of the door during the gear movement:
I have not yet done any of this follow-up door work, or been involved with this phase of the build. But, it kind of mystifies me - actually! There is a lot going on there, and the motion of the MLG adds a whole other level of complexity. Well done, Francis!!
Notice the MGL uplock that Francis fabricated using Ray's airplane as a guide. This appears to be the best way to go here and I will eventually set up the standard Prowler kit with this design:
Wheel well parts:
It took me a little while to figure out what Francis was trying to convey to me about his MLG uplock assemblies. It turns out, the disk brake ring was interfering with the auto door latch mechanisms. What this pic is showing is the area where the disk brake ring interferes is shaded in black on the uplock mechanism.
This pic shows it a little better. He outlined in black on the uplock assembly where he was going to have to grind off some material to allow the uplock stud to travel far enough into the uplock to actually latch to the stud.
Here is the uplock with the material removed:
And, here is where Francis placed modeling wax on the uplock to see if/where the MLG brake disc assembly touches the uplock:
With that complete, he flipped the whole center section over and started on the cockpit framing. First, the firewall:
It looks like he has positioned some plywood jigs that will hold the sidewall formers:
Then, add some side formers:
Here he is installing the neg-G modification plates that connects the cockpit sides and skins directly to the main wing spar under the floor:
A good close up:
If I remember correctly, at the time I did not have sets of these neg-G mods in inventory. Also, considering the hassles of international shipping (including Francis having to pay import taxes), I decided to send my drawings of these parts to Francis and allow him to fabricate his own brackets (he is an aircraft mechanic in France and an accomplished welder). They turned out very well!
Then, I believe that Francis removed the firewall and the longerons to install the motor mount brackets into the floor channels on the front of the cockpit floor:
At some point, it looks like he also finished up some of his work on the actuator that moves the doors on the radiator boxes. Here is a view of his right wing and the torque tubes for both the radiator doors and for the flaps:
Here is the installation in the left wing with the linear motor and the attachment to the torque tube. You can also see the left side flap actuator:
I got these just a few days ago from Francis. These seem to be showing a part that he has fabricated and placed in the area above the wing and below the cockpit floor on the aft end of the cockpit.
These are the very most recent pics from Francis. In fact, I got them the day before I published this update! They show his overall progress:
Outstanding work, as always, Francis!
Bryan - Kit #007 - Last year, Bryan had purchased this wrecked Acura. He did that solely to harvest the engine out of it. After a lot of research and planning, he decided that the engine in this vehicle is what he wants to power his Prowler with.
After extricating the engine from the vehicle, he built a test stand and installed it.
By March, he figured out that he was going to need an adapter plate to mount the OEM throttle body (TB) to the OEM intake manifold (IM). If I recall correctly, there was some other device that was between them on the OEM installation - but he needed to delete it and just mount them together. Here is the TB that would mount to one side of the adapter:
Here is the IM flange that would mount to the other side of the adapter plate:
This pic shows where the adapter plate would mount and secure the two part together:
He asked if I could help him with this and I started with a CAD drawing to make certain that all the dimensions and placements were correct:
After a lot of texting drawings back-and-forth, I finally had what we both agreed was a good design:
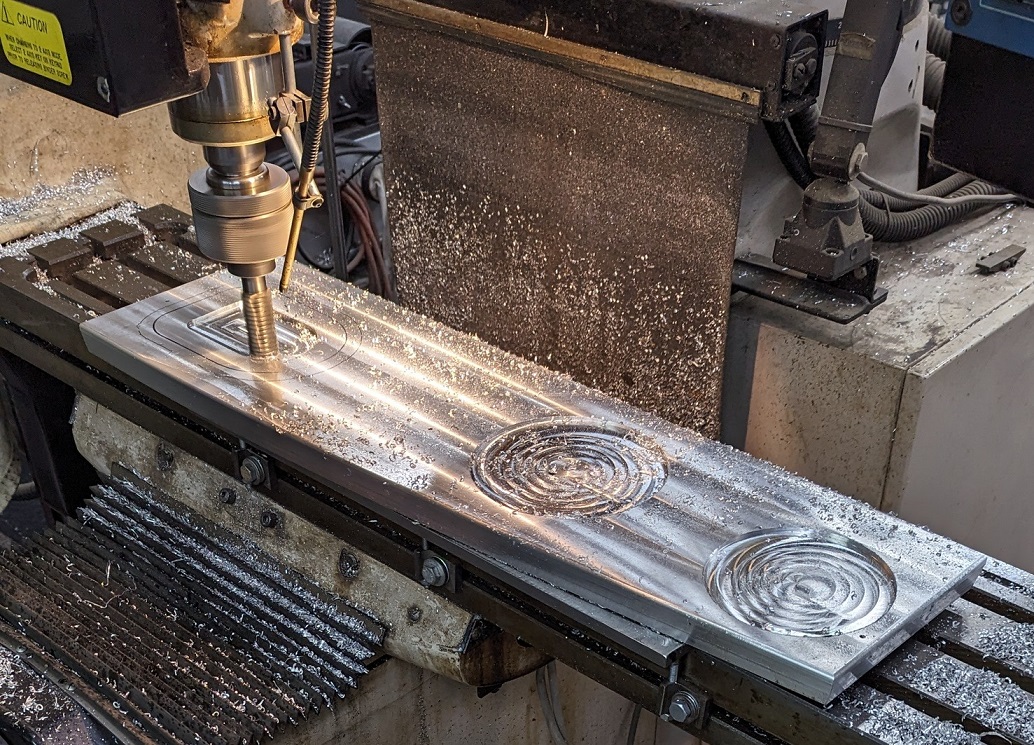
I machined up a block of aluminum to get started:
Then, I fixtured it into the CNC mill and got started making chips:
Here is the final product:
This is another pic of where the adapter plate needed to go:
And this is the adapter plate installed in position:
Overall, Bryan reported that it fit perfectly. The only issue was that the throat was a little offset on the TB side - which creates this little smile that you can see here:
During final assembly, he is going to hand work a little more chamfer into the adapter plate in that area to get rid of the "smile" and prevent any airflow disruption.
Another part of his project to adapt this engine to his FWF package is to create an adapter that will drive off of the transmission input side of the engine and into the PSRU. This pic gives and idea of what he needs to do.
I believe that this disk is part of his flywheel or torque converter from his engine.
I think Bryan is going to try to adapt this disk. If that doesn't go well, I offered to help him machine a new plate from scratch. This might be a topic in a future update.
I have even started a CAD drawing of a ruff idea/concept for an adapter for his project:
Here is an example of this adapter mounted in someone else's FWF application. It is just to give an idea of what Bryan is also trying to accomplish with his setup?
Bryan is planning to use AutoPSRU's gear box for his FWF package. In August, after AirVenture, he loaded up his trailer, packed his RV and headed to Texas to meet with Stuart and Larry. For almost a week they worked on details of what it will take for Bryan to make his engine work with the AutoPSRU's 300Z gearbox.Here they are hard at work and "pounding out" the details:
The last report I got from Bryan was in Sep when he sent me these pics of his continuing work on his engine. It looks like he is refining the motor mount (to include mounting pads for the PSRU):
And, it looks like this is an oil tank that he will be adding to the system:
In our most recent conversation, Bryan was talking about removing his center section wing to make some modifications that will better support his new FWF systems. Remember, he originally built the center section with the idea in mind that he would be using the diesel engine package. For example, he was planning to use one of the wing root radiators specifically for oil cooling of the diesel engine. Now, that will not longer be the case. I will update more about his future plans as they unfold.
That's all I have for this "catch-up" update. Thanks for checking in again!
My next update is going to cover the remaining Prowler related items from 2024. I will try to have it out soon!
Vaughn - Kit#13: Late last year, I made a horse collar and longerons for Vaughn as he started to make plans to complete the engine compartment on his Prowler. He had also purchased a set of engine mounts from Bryce a while back. With all these parts, he was ready to begin work on the engine compartment framing. Here are some pics he sent me:
He is planning to install a modified Mazda rotary engine in his plane. That engine is significantly lighter than the typical V8 package. Because of this, Vaughn has stretched his engine compartment and had to get inventive in a quest to manage the weight & balance of his airplane. Including this:
Yes! That's a steel plate formed into a bracket that helps extend the horse collar far enough forward to and adds a bit more weight farther forward. There's more he will need to do, but every bit helps! Here is his initial framing clamped up:And, later, cleco'ed together:
As a side project, he has been forming his own canopy frame for the airplane. .
He has most of the frame together, but he has not been able to successfully form the aft frame piece. The radius is so tight that the tubing ends up kinking or failing before he can get it formed. He also has made a much larger access panel for his tailwheel compartment so that he can get in to work on the tailwheel parts and linkages much easier:
Most recently, he has started to teach himself how to run the English wheel. Below, you can see his first two panels for the engine compartment being worked on in front of the English wheel:
As his skills with the English wheel improved, he moved on to forming more of the larger panels in the engine compartment.
It is looking really good!
As he learned more about using the English wheel and working with the aluminum skin sheets, he other parts of the plane. Here is a look at the MLG follow-up doors and work on the wheel wells:
Here's the other side:
Now, he has gotten better with the metal forming, he has made some sections of his wing root to fuselage wing fairing panels. Those look excellent!
Here are the most recent pics of his engine compartment panels:
Excellent work, Vaughn! I know that we have talked about the learning curve for forming these skin panels. It really looks to me like you are conquering that beast! Well done! Keep up the great work, Vaughn!
Francis - Kit#11: I believe the year started with Francis working on his MLG follow up doors and wheel wells. I think I sent Francis the pattern for making this bracket that ties together the wing inner nose rib, the leading edge skin and the firewall. Here is one of his installed:These pics show Francis working on the position and alignment of the MLG follow-up doors in the gear up position:
And, in the gear down position:
Here is a video of the door during the gear movement:
I have not yet done any of this follow-up door work, or been involved with this phase of the build. But, it kind of mystifies me - actually! There is a lot going on there, and the motion of the MLG adds a whole other level of complexity. Well done, Francis!!
Notice the MGL uplock that Francis fabricated using Ray's airplane as a guide. This appears to be the best way to go here and I will eventually set up the standard Prowler kit with this design:
Wheel well parts:
It took me a little while to figure out what Francis was trying to convey to me about his MLG uplock assemblies. It turns out, the disk brake ring was interfering with the auto door latch mechanisms. What this pic is showing is the area where the disk brake ring interferes is shaded in black on the uplock mechanism.
This pic shows it a little better. He outlined in black on the uplock assembly where he was going to have to grind off some material to allow the uplock stud to travel far enough into the uplock to actually latch to the stud.
Here is the uplock with the material removed:
And, here is where Francis placed modeling wax on the uplock to see if/where the MLG brake disc assembly touches the uplock:
With that complete, he flipped the whole center section over and started on the cockpit framing. First, the firewall:
It looks like he has positioned some plywood jigs that will hold the sidewall formers:
Then, add some side formers:
Here he is installing the neg-G modification plates that connects the cockpit sides and skins directly to the main wing spar under the floor:
A good close up:
If I remember correctly, at the time I did not have sets of these neg-G mods in inventory. Also, considering the hassles of international shipping (including Francis having to pay import taxes), I decided to send my drawings of these parts to Francis and allow him to fabricate his own brackets (he is an aircraft mechanic in France and an accomplished welder). They turned out very well!
Then, I believe that Francis removed the firewall and the longerons to install the motor mount brackets into the floor channels on the front of the cockpit floor:
At some point, it looks like he also finished up some of his work on the actuator that moves the doors on the radiator boxes. Here is a view of his right wing and the torque tubes for both the radiator doors and for the flaps:
Here is the installation in the left wing with the linear motor and the attachment to the torque tube. You can also see the left side flap actuator:
I got these just a few days ago from Francis. These seem to be showing a part that he has fabricated and placed in the area above the wing and below the cockpit floor on the aft end of the cockpit.
These are the very most recent pics from Francis. In fact, I got them the day before I published this update! They show his overall progress:
Outstanding work, as always, Francis!
Bryan - Kit #007 - Last year, Bryan had purchased this wrecked Acura. He did that solely to harvest the engine out of it. After a lot of research and planning, he decided that the engine in this vehicle is what he wants to power his Prowler with.
After extricating the engine from the vehicle, he built a test stand and installed it.
By March, he figured out that he was going to need an adapter plate to mount the OEM throttle body (TB) to the OEM intake manifold (IM). If I recall correctly, there was some other device that was between them on the OEM installation - but he needed to delete it and just mount them together. Here is the TB that would mount to one side of the adapter:
Here is the IM flange that would mount to the other side of the adapter plate:
This pic shows where the adapter plate would mount and secure the two part together:
He asked if I could help him with this and I started with a CAD drawing to make certain that all the dimensions and placements were correct:
After a lot of texting drawings back-and-forth, I finally had what we both agreed was a good design:
I machined up a block of aluminum to get started:
Then, I fixtured it into the CNC mill and got started making chips:
Here is the final product:
This is another pic of where the adapter plate needed to go:
And this is the adapter plate installed in position:
Overall, Bryan reported that it fit perfectly. The only issue was that the throat was a little offset on the TB side - which creates this little smile that you can see here:
During final assembly, he is going to hand work a little more chamfer into the adapter plate in that area to get rid of the "smile" and prevent any airflow disruption.
Another part of his project to adapt this engine to his FWF package is to create an adapter that will drive off of the transmission input side of the engine and into the PSRU. This pic gives and idea of what he needs to do.
I believe that this disk is part of his flywheel or torque converter from his engine.
I think Bryan is going to try to adapt this disk. If that doesn't go well, I offered to help him machine a new plate from scratch. This might be a topic in a future update.
I have even started a CAD drawing of a ruff idea/concept for an adapter for his project:
Here is an example of this adapter mounted in someone else's FWF application. It is just to give an idea of what Bryan is also trying to accomplish with his setup?
Bryan is planning to use AutoPSRU's gear box for his FWF package. In August, after AirVenture, he loaded up his trailer, packed his RV and headed to Texas to meet with Stuart and Larry. For almost a week they worked on details of what it will take for Bryan to make his engine work with the AutoPSRU's 300Z gearbox.Here they are hard at work and "pounding out" the details:
The last report I got from Bryan was in Sep when he sent me these pics of his continuing work on his engine. It looks like he is refining the motor mount (to include mounting pads for the PSRU):
And, it looks like this is an oil tank that he will be adding to the system:
In our most recent conversation, Bryan was talking about removing his center section wing to make some modifications that will better support his new FWF systems. Remember, he originally built the center section with the idea in mind that he would be using the diesel engine package. For example, he was planning to use one of the wing root radiators specifically for oil cooling of the diesel engine. Now, that will not longer be the case. I will update more about his future plans as they unfold.
That's all I have for this "catch-up" update. Thanks for checking in again!
My next update is going to cover the remaining Prowler related items from 2024. I will try to have it out soon!
Sunday, December 15, 2024
Dies, Dies and More Dies! [Catch-up Update #1] (Jan-Jul 2024)
In this update, I decided to only cover the work that I did on making dies to form all the parts of the Prowler wing. So my die cutting work will be the sole topic on this post. I also worked on many other projects in conjunction with making these dies - meaning, I started and finished several other projects while still working to complete all of the wing dies. So, as I mentioned in the previous update, I made a lot of chips this year:
This is how the area around my mill looked every time I worked on making a new die.
By my count, there are 50 major formed parts that make up the center and outboard wing sections. And, because each die is undercut by 10 degrees - every formed wing part has to have it's own particular die (form block) for the pressing operation. (Recall, the under cut allows over-bending on each flange and this is to compensate for the springback of the flanges during the forming process). So, I have to (had to) cut 50 forming dies - one for each part of the Prowler wing!
However, I have previously fabricated several of these dies. The first die that I made was to test the 100 Ton press that I put together many years ago. To test that press, I wanted to start with a part that had a rather small surface area facing the rubber pad. The part I chose was WCS59.
That part is one of the three parts that makes up the bulkhead that is aft of the main spar and just forward of the joystick torque tube under the cockpit floor. [More Info Here - See Item #2]
Later, after completing some tweaks on the 100 Ton press, I fabricated the two wing tip rib dies. Then, I successfully pressed out a set of tip ribs for the Prowler.
This was something that I really celebrated and got a lot of satisfaction out of accomplishing! [More Info Here]
In late 2014, Francis needed to have 4 new nose ribs to replace the ones he had not gotten with his kit.
So, I cut the needed nose rib dies and pressed out those parts for him. [More Info Here - See Item #1]
In 2019, after I completed the 400 Ton press, I needed to make a part to test it. I decided to do a set of floor stringers dies (FFA23&24) - for several reasons: A. I needed a set of these parts for Kit #18; B. These are some of the largest parts that I need to form to make a Prowler kit and I wanted to see that the press could do it; C. Ray, and others, had made me aware that this part was too short on their kits and needed to be modified; and finally, D. I knew that Francis was coming to a point where he would need this set of parts and I wanted him to have a good set to put on his airplane.
So, I checked out my CAD drawings and did a "virual" assembly of all the parts under the cockpit floor. It was true, that part was too short. I made the necessary corrections and fabricated a set of dies to make these floor stringers. [More Info Here - See Item #1].
A little later, I made the set for Francis and sent them to him for his Prowler. In fact, the two younger daughters were home at that time, so I had each one of them take a turn at pressing out one of the two parts:
That almost 5 years ago! Yikes!!
So, removing these 9 dies from "the list" left me with about 41 dies to cut. My goal was to get these all finished up before I left the shop this summer to head to WI for AirVenture 2024. I ended up getting 36 of these dies cut. Rather than rush to get the remaining 5 dies done, I decided to leave them for this fall when I could take my time and double check a lot of measurements on the CAD drawings and laptop. I want to get them right the first time and I don't want to have to re-make any of them because I missed a bad or incorrect dimension. Of the remaining 5 dies, only one will be modestly difficult to make (the aft bulkhead). The other 4 will be pretty straight forward and fairly quick to make - as they all have straight sides (inter-web bulkheads). I hope to get these remaining dies cut in the next several weeks.
Back to the beginning of 2024. I started with a pile of 1" thick aluminum plates that I had previously roughly cut to the required shape and stacked on a dolly. You may recall these pics from a while ago:
[More Info Here - See Item #3] As it turns out, I pretty much worked this pile from the top down. I actually was trying to focus on cutting the longest dies first. They are the most work and take my mill to the limits of X and Y table motion. So, I had to be really careful how I fixtured the long dies in the mill so that the machine would not "over travel" the X and Y limits. With some careful planning (and sometimes sketchy execution) I was able to get them all completed. Here are several pics of cutting various dies this year - in no particular order:
There were mid-ribs:
Center section nose ribs:
And; here is a combination floor stringer (top) and mid-rib (bottom) in the center section:
Not sure what this is - an outboard mid-rib?:
This is a set of outboard wing mid-ribs:
+++++++++++++++++++++++++++++++++++++++++
SIDEBAR #1
I really only had one major goof while cutting all these dies. I try to double check every dimension multiple times and I always do a "air cut" on each die before I finally start making chips. It has all paid off, but sooner or later Murphy catches up to you. On one of the longer dies, I cut the pockets for the lightening holes in the face a bit too large. It was for part WCF77. It's one of the longest dies and I cut the lightening holes with each on 1/2" too large of a diameter. I know how it happened. I take the size of the lightening hole and I add 1/4" to the radius to get the size of the pocket to cut. Well, I ended up adding the 1/4" to the radius twice. Doh!!
I considered several ways to try to fix the die and there was always the option to just get a new piece of stock and cut the die completely over. After much consideration, I decided to take it to a local weld shop and have the corners of the pockets have aluminum weld added to them. This is how the die looked when I got it back from the welder and after I fixtured it back into the mill:Then, I re-faced the top of the die:
Then, I tried to re-cut the walls of the pockets to the correct depth:
In the end, there were several places where the weld did not fill in completely. Also, when I removed it from the mill, the die had a lot of warp to it. I tried to straighten the die and get it flat again. But, it was warped in 2 directions - which made it hard to do. In the end, the heat of the welding caused the die to warp quite substantially and it was just not going to come out. So, I ordered a new stick of 1" x 10" aluminum bar, cut a hunk off and I just re-cut the entire die. It was a lot more expense and took a lot more time to remake this die. But, I didn't want to risk having a warped die make warped aircraft parts - so it was worth it to just remake that die. Here on top is the die that I eventually remade:END SIDEBAR #1
+++++++++++++++++++++++++++++++++++++++++
SIDEBAR #2
As I was making all of these dies this year, I noticed my undercut tool is getting dull. I only have this one tool. It was made by a local (retired) tool and die maker that I found several years ago. Here is the tool he made me back then:
You can see how it works to make the "undercut" on my dies. Even though I am only cutting aluminum with this tool (I go to great lengths to make sure I don't accidentally cut a steel screw or dive it into the steel fixture plate.) Still, if you cut enough of anything, even butter, your tool will wear! And, this is what I was noticing.
Unfortunately, since JD first made this tool for me, he became a victim on the Carr Fire in 2018 and he lost everything! His house and shop burned to the concrete slab. Having already been retired, he decided that he was not going to replace any of his machines and was not going to do any "semi-retired" work any longer.
So, how to get a new cutter? I searched around and found a few tool and die makers in the Sacramento area. It was going to be a little bit of a PITA (and stupid expensive) to find a place that cares to do a "one-off" job like this for me. I searched online for a while and eventually found a tool maker that had a dovetail cutter with the correct angle that I needed:But, there were two problems with this. First, it's a carbide cutter - which I really don't need. HSS (High Speed Steel) is all that is really needed for cutting aluminum at the slower spindle speeds that my machine is capable of. But, it will work. Second, the overall cutting length was too short. I downloaded the cutter specs, fired up my CAD software and here is what I sorted out:
The thing to notice in this pic above is that when the rounded over top edge of the die is touching the shank, it will not undercut the die sufficiently. It interferes by over .033". In order to use it, I would have to reduce the shank radius by at least .040". I ordered the cutter, knowing that I was going to have to grind down the shank.
To reduce the shank diameter, I needed a tool post grinder to put on my lathe - which I did not have. But, a hundred unfinished projects in the shop is just not enough, so let's add another project and make one! I foraged around for a while and found an old chain saw sharpening grinder that I gotten in some auction lot and shoved it in the back of a drawer. This thing:
If this was going to work, I was going to have to cut off the part of the guard outside of the black sharpie line. Then, I was going to have to replace the pink grinding disc with a oxide disc that will cut carbide. So I ordered one those and cut it down to the size to fit on the grinder:
Next, I was going to need something that I could mount the grinder to that I could then mount to the lathe. I found an old piece of aluminum plate that I had in "the pile":
After some cutting and cleaning I had this:
I turned down a spacer that would help mount this to the tool post:
And eventually ended up with this:
It took a while to give this "barely capable" tool post grinder to do it's thing. But, eventually I ended up with what I needed:
For purposes of that photo, I included the aft floor stringers and the aft center section bulkhead. I included them even though they are not actually included wing sub-kits. (The floor stringers are in the Fuselage Floor sub-kit.) But, since they all must be used when assembling the main center section of the plane, I included them for completeness. You really cannot build the center section of the plane without including these formed parts.
The 5 unfinished dies were also included - four of which are fuel tank bulkheads (placed aft of the outboard wing mid-ribs). The remaining one is the aft bulkhead that is in the far back right side. The rest of the dies in the pic above are in the condition that they will be when they are used to make Prowler parts in the future.
Once I finish the 5 remaining dies, the next step will be to go back to the laptop and the CAD software to complete an accurate drawing (and G-code) for each of the blanks that will be pressed over each of these dies. That will be almost as big of a task as cutting these dies. As the saying goes, "it's complicated" and there is a lot involved with this. I will expand on that and discuss it more in a future update(s). That will do it for this update. Thanks for checking out this update! I hope to have another out soon!
This is how the area around my mill looked every time I worked on making a new die.
By my count, there are 50 major formed parts that make up the center and outboard wing sections. And, because each die is undercut by 10 degrees - every formed wing part has to have it's own particular die (form block) for the pressing operation. (Recall, the under cut allows over-bending on each flange and this is to compensate for the springback of the flanges during the forming process). So, I have to (had to) cut 50 forming dies - one for each part of the Prowler wing!
However, I have previously fabricated several of these dies. The first die that I made was to test the 100 Ton press that I put together many years ago. To test that press, I wanted to start with a part that had a rather small surface area facing the rubber pad. The part I chose was WCS59.
That part is one of the three parts that makes up the bulkhead that is aft of the main spar and just forward of the joystick torque tube under the cockpit floor. [More Info Here - See Item #2]
Later, after completing some tweaks on the 100 Ton press, I fabricated the two wing tip rib dies. Then, I successfully pressed out a set of tip ribs for the Prowler.
This was something that I really celebrated and got a lot of satisfaction out of accomplishing! [More Info Here]
In late 2014, Francis needed to have 4 new nose ribs to replace the ones he had not gotten with his kit.
So, I cut the needed nose rib dies and pressed out those parts for him. [More Info Here - See Item #1]
In 2019, after I completed the 400 Ton press, I needed to make a part to test it. I decided to do a set of floor stringers dies (FFA23&24) - for several reasons: A. I needed a set of these parts for Kit #18; B. These are some of the largest parts that I need to form to make a Prowler kit and I wanted to see that the press could do it; C. Ray, and others, had made me aware that this part was too short on their kits and needed to be modified; and finally, D. I knew that Francis was coming to a point where he would need this set of parts and I wanted him to have a good set to put on his airplane.
So, I checked out my CAD drawings and did a "virual" assembly of all the parts under the cockpit floor. It was true, that part was too short. I made the necessary corrections and fabricated a set of dies to make these floor stringers. [More Info Here - See Item #1].
A little later, I made the set for Francis and sent them to him for his Prowler. In fact, the two younger daughters were home at that time, so I had each one of them take a turn at pressing out one of the two parts:
That almost 5 years ago! Yikes!!
So, removing these 9 dies from "the list" left me with about 41 dies to cut. My goal was to get these all finished up before I left the shop this summer to head to WI for AirVenture 2024. I ended up getting 36 of these dies cut. Rather than rush to get the remaining 5 dies done, I decided to leave them for this fall when I could take my time and double check a lot of measurements on the CAD drawings and laptop. I want to get them right the first time and I don't want to have to re-make any of them because I missed a bad or incorrect dimension. Of the remaining 5 dies, only one will be modestly difficult to make (the aft bulkhead). The other 4 will be pretty straight forward and fairly quick to make - as they all have straight sides (inter-web bulkheads). I hope to get these remaining dies cut in the next several weeks.
Back to the beginning of 2024. I started with a pile of 1" thick aluminum plates that I had previously roughly cut to the required shape and stacked on a dolly. You may recall these pics from a while ago:
[More Info Here - See Item #3] As it turns out, I pretty much worked this pile from the top down. I actually was trying to focus on cutting the longest dies first. They are the most work and take my mill to the limits of X and Y table motion. So, I had to be really careful how I fixtured the long dies in the mill so that the machine would not "over travel" the X and Y limits. With some careful planning (and sometimes sketchy execution) I was able to get them all completed. Here are several pics of cutting various dies this year - in no particular order:
There were mid-ribs:
Center section nose ribs:
And; here is a combination floor stringer (top) and mid-rib (bottom) in the center section:
Not sure what this is - an outboard mid-rib?:
This is a set of outboard wing mid-ribs:
+++++++++++++++++++++++++++++++++++++++++
SIDEBAR #1
I really only had one major goof while cutting all these dies. I try to double check every dimension multiple times and I always do a "air cut" on each die before I finally start making chips. It has all paid off, but sooner or later Murphy catches up to you. On one of the longer dies, I cut the pockets for the lightening holes in the face a bit too large. It was for part WCF77. It's one of the longest dies and I cut the lightening holes with each on 1/2" too large of a diameter. I know how it happened. I take the size of the lightening hole and I add 1/4" to the radius to get the size of the pocket to cut. Well, I ended up adding the 1/4" to the radius twice. Doh!!
I considered several ways to try to fix the die and there was always the option to just get a new piece of stock and cut the die completely over. After much consideration, I decided to take it to a local weld shop and have the corners of the pockets have aluminum weld added to them. This is how the die looked when I got it back from the welder and after I fixtured it back into the mill:Then, I re-faced the top of the die:
Then, I tried to re-cut the walls of the pockets to the correct depth:
In the end, there were several places where the weld did not fill in completely. Also, when I removed it from the mill, the die had a lot of warp to it. I tried to straighten the die and get it flat again. But, it was warped in 2 directions - which made it hard to do. In the end, the heat of the welding caused the die to warp quite substantially and it was just not going to come out. So, I ordered a new stick of 1" x 10" aluminum bar, cut a hunk off and I just re-cut the entire die. It was a lot more expense and took a lot more time to remake this die. But, I didn't want to risk having a warped die make warped aircraft parts - so it was worth it to just remake that die. Here on top is the die that I eventually remade:END SIDEBAR #1
+++++++++++++++++++++++++++++++++++++++++
SIDEBAR #2
As I was making all of these dies this year, I noticed my undercut tool is getting dull. I only have this one tool. It was made by a local (retired) tool and die maker that I found several years ago. Here is the tool he made me back then:
You can see how it works to make the "undercut" on my dies. Even though I am only cutting aluminum with this tool (I go to great lengths to make sure I don't accidentally cut a steel screw or dive it into the steel fixture plate.) Still, if you cut enough of anything, even butter, your tool will wear! And, this is what I was noticing.
Unfortunately, since JD first made this tool for me, he became a victim on the Carr Fire in 2018 and he lost everything! His house and shop burned to the concrete slab. Having already been retired, he decided that he was not going to replace any of his machines and was not going to do any "semi-retired" work any longer.
So, how to get a new cutter? I searched around and found a few tool and die makers in the Sacramento area. It was going to be a little bit of a PITA (and stupid expensive) to find a place that cares to do a "one-off" job like this for me. I searched online for a while and eventually found a tool maker that had a dovetail cutter with the correct angle that I needed:But, there were two problems with this. First, it's a carbide cutter - which I really don't need. HSS (High Speed Steel) is all that is really needed for cutting aluminum at the slower spindle speeds that my machine is capable of. But, it will work. Second, the overall cutting length was too short. I downloaded the cutter specs, fired up my CAD software and here is what I sorted out:
The thing to notice in this pic above is that when the rounded over top edge of the die is touching the shank, it will not undercut the die sufficiently. It interferes by over .033". In order to use it, I would have to reduce the shank radius by at least .040". I ordered the cutter, knowing that I was going to have to grind down the shank.
To reduce the shank diameter, I needed a tool post grinder to put on my lathe - which I did not have. But, a hundred unfinished projects in the shop is just not enough, so let's add another project and make one! I foraged around for a while and found an old chain saw sharpening grinder that I gotten in some auction lot and shoved it in the back of a drawer. This thing:
If this was going to work, I was going to have to cut off the part of the guard outside of the black sharpie line. Then, I was going to have to replace the pink grinding disc with a oxide disc that will cut carbide. So I ordered one those and cut it down to the size to fit on the grinder:
Next, I was going to need something that I could mount the grinder to that I could then mount to the lathe. I found an old piece of aluminum plate that I had in "the pile":
After some cutting and cleaning I had this:
I turned down a spacer that would help mount this to the tool post:
And eventually ended up with this:
It took a while to give this "barely capable" tool post grinder to do it's thing. But, eventually I ended up with what I needed:
This should work. I will have to cut the undercut on the future dies in two passes, but now this tool will have the shank clearance to do what I need it to do.
END SIDEBAR #2
+++++++++++++++++++++++++++++++++++++++++
When the clock finally ran out this summer and it was time to pack up for the trip to AirVenture, I had 36 of the 41 dies finished. At that point, I decided to take time and create a photo op that would summarize what I had just spent 7 months working on. I took all the dies that I had made (and the 5 remaining unfinished
blanks) and placed them onto a 12' x 10' tarp in the approximate
location of the part that it will make. Just for reference, the tarp is
12' wide and the longest dies (top center) are over 3' long:
For purposes of that photo, I included the aft floor stringers and the aft center section bulkhead. I included them even though they are not actually included wing sub-kits. (The floor stringers are in the Fuselage Floor sub-kit.) But, since they all must be used when assembling the main center section of the plane, I included them for completeness. You really cannot build the center section of the plane without including these formed parts.
The 5 unfinished dies were also included - four of which are fuel tank bulkheads (placed aft of the outboard wing mid-ribs). The remaining one is the aft bulkhead that is in the far back right side. The rest of the dies in the pic above are in the condition that they will be when they are used to make Prowler parts in the future.
Once I finish the 5 remaining dies, the next step will be to go back to the laptop and the CAD software to complete an accurate drawing (and G-code) for each of the blanks that will be pressed over each of these dies. That will be almost as big of a task as cutting these dies. As the saying goes, "it's complicated" and there is a lot involved with this. I will expand on that and discuss it more in a future update(s). That will do it for this update. Thanks for checking out this update! I hope to have another out soon!
Subscribe to:
Posts (Atom)


.jpg)