Thanks for stopping by. The past two weeks yeilded 5-6 more days in the shop. It woud have been more, but I had to do my 2011 taxes, honey-do's, and some kid stuff. Overall, it's been a fairly productive couple of months in the Prowler shop. The time required on the day-job is going to step up for the next several weeks, but then I'll have "Pop in the Shop" the last 10 days of March - so we'll get something done then, for sure. In this update:
1. George Stopped By The Shop.
2. A Prowler For Sale
3. MotionMonster Spoilboard Refacing.
4. Main Spar Center Section.
5. Center Section Skin Flanges.
6. Chuck's Having A Blast.
I didn't work much with the press brake in this past two weeks. I'm still working things out (in my mind) as to how to "calibrate" this machine. I'm now certain that it will bend this aluminum, and it will make nice bends. The trick is going to be getting it to bend at the desired angles, consistently. The other trick is going to be trying to get "calibration data" without cutting up and wasting a bunch of 2024-T3 that cost $250 a sheet. So, it's the next item on the agenda, and I plan to work on this exclusively the next days I get in the shop. Mostly, my progress on the airplane will soon grind to a halt because every part needed to complete the spars will be needing to be bent in the press brake. So, like many things in life, the criticality of needing this process to work will soon take over and "drive the bus" for a while.
The upside to this is that when I finally conquer the beast, I will have production processes in place to produce about 50-60% of the airfame (minus the landing gear and some torque box parts). Approx. 10% would be all the chromoly steel welded parts in various places on the airplane. The remaining 20-30% involves the process of rubber pad pressing (low budget hydroforming) to make all of the formed parts (wing ribs, bulkhead formers, etc.) I've discussed a lot of this technique and the future plans for it in previous posts. With that being said, on with the update.
1. George Stopped By The Shop - George stopped by the shop last week to drop off the flyers in the segment below. He has recently gotten hooked up to high speed internet and has found our blog site. He came by to ask if I would post the for sale flyers he made up for his airplane on the blog. At 84 he is doing great and even thinking about undertaking a Prowler project - for something to do. If anything develops on this front, I'll report on it in a future post.
2. Prowler For Sale - George has had his 3rd Prowler for sale for a while now. These are the flyers he asked me to post here on the blog. The airplane is currently hangared at the Red Bluff, CA airport (KRBL).


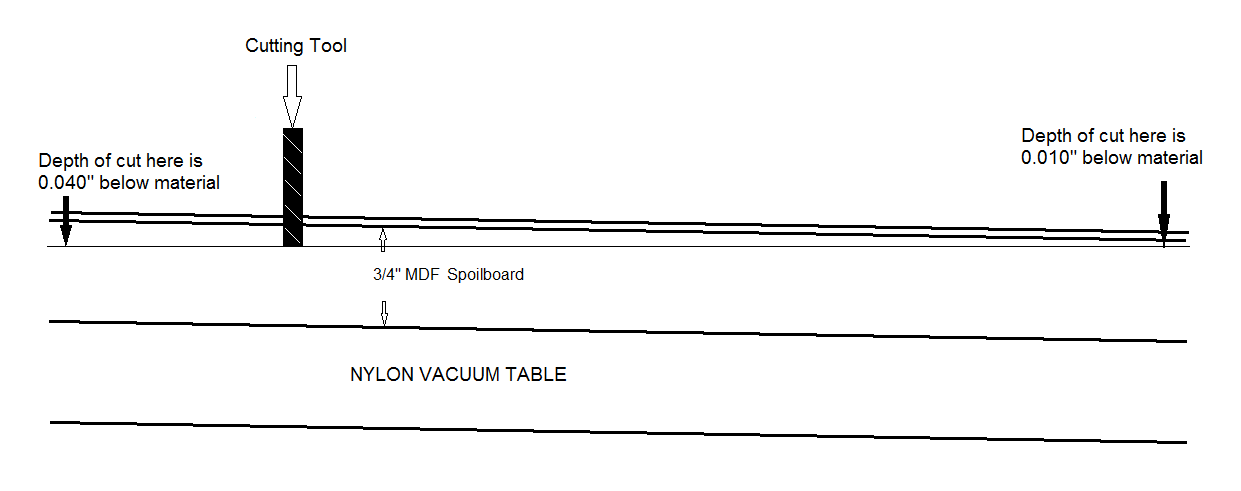
3. MotionMonster Spoilboard Re-facing - I finally got around to cleaning up the spoilboard on the MotionMonster. This has to be done anytime you mount a new spoilboard on a CNC router. There are two main reasons for needing to do this: 1) the main X and Y axes are not perfectly parallel to the top of the vacuum table that the spoilboard is installed on; 2) The spoil board is not a uniform thickness. In the case of the MotionMaster, the main stationary gantry that is the X axis (and has the spindle carriage mounted to it) is pretty large and heavy. The best that I can tell, the gantry is about 0.030" out of parallel with the vacuum table/spoilboard. That's not bad, considering the thing weighs in at about 2 tons. There are several ways to try to physically make the gantry perfectly parallel to the table. But, for this small amount the easiest way is to just shave off the difference. Here's a picture to show what's involved (angles are exaggerated and amplified for clarity):

4. Main Spar Center Section - When edge milling the parts of the spar made from the thicker sheets of .100" and .160" (described in the last post), you find out that it doesn't take long before you can get a razor edge on the corners of all the milled pieces. This is particularly bad in two respects: 1) you can get some really nasty cuts; and 2) it is a property of most metals to form stress cracks (from fatigue failure) at the thinnest point in the material. These stress cracks, once started, will propagate thru the material if left unchecked. So, to prevent this from happening, you simply file the edges with a single cut mill file so that the edge has a small radius. Now, you take these fatigue stresses and spread them out over a bigger surface area and the cracks are less likely to start.
Well, doing this to exactly 18 edges on 19 pieces might be simple, but it is also tiedious. So, over the past couple of weeks I would do one or two pieces a day, while the router machine was running and it helped to spread-out the "tediousness" (is that a word?). Anyway, now all of the thick center spar pieces are done and waiting to be hit with the scotchbrite and then the alodine. Here is the "stack."

5. Center Section Skin Flanges - With the spoilboard faced off and armed with a couple of new 1/8" router bits, I decided to give another try at cutting parts. I was a little "gun shy" of going at this again, with the number of broken bits in my router parts box far outnumbering the ones that are still in tact. But, I "manned-up" and turned on the machine. I started using a new style of bit for the first time. This time a used a 2 flute, straight flute, 1/8" carbide cutter. The straight flutes are very good for this profile type cutting application because it puts all the cutting forces directly parallel to the centerline of the material and does not try to lift the material off of the vacuum table/spoilboard (like a helical cutter does). It works much better. This time I also started with a lot higher spindle speed and a lot lower feedrate. I started with 12K rpm on the spindle and feedrate at 4ipm. I could tell that I was making aluminum powder for chips so I slowly, step-by-step kept moving the feedrate up and by the time I was done I was cutting at 14K rpm and 10ipm. I managed to cut out the 10 pieces of the center section spar skin flanges without breaking a bit. So far, so good - I still have the same cutter in one piece! Here's a couple of pics:

These are the lower skin flanges for the center section spar being cut.

It turns out that at 14K rmp, I should actually be able to feed that cutter at up to 18 ipm. So, on my next attempt, I'll step the feedrate up a little more. Overall, I'm very happy with the results. The parts come out with a burr on the edges (as expected), but they are accurate. I can match skin flange rivet holes to the holes in the spar caps - and they match, perfectly! This CNC stuff really works. It's encouraging. I am imagining the possibilities to be able to do "matched hole drilling" for most of the parts of the airplane. The time savings for future kits (builders) would be huge - as compared to previous methods. Rest assured, I will be working this into the prodcution process whenever and where-ever possible.
6. Chuck's Having a Blast - Just one quick builder update this time. I have it from a reliable source that Chuck has been flying his Prowler quite a bit lately. He is apparently "having a blast" flying his plane. Rumor has it that the airplane has been operated fairly close to the speed limit, fairly close to the (minimum) altitude limit, and in VERY close proximity to his own house! Huh - imagine that. Congratulations Chuck.
That's about all the news that worth using up electrons to post about. I expect with the work sked coming up and the folks visiting in late Mar, I'll probably try to post an update in early Mar and then again in early April.
As always, thanks for stopping by to check on the progress here at Prowler Aviation.


