CNC Background - After building the sub-kit for the Vert Stab recently, my focus in NorCal has shifted to getting the wing spar (center section and outter sections) into the wing jig. While Dave is back in FL practicing his riveting so he can start the vert stab assembly, I have run into the need to fabricate several steel pieces for the wing spar. Faced with the prospect of having to hack these parts out buy hand or trying to get set up to do these parts with a plasma cutter - we opted for the later.
If you recall, I mentioned in a previous post that John "Cabi" Cabigas is also building a Prowler. In fact, here's a link: http://prowlerjaguar.blogspot.com/ . Cabi bought a CNC plasma torch a while back and I contacted him about making some of these parts. Turns out, he had already modeled several of the parts that I need to have made. One of the biggest pieces is the wing attach plate that is bolted to the center wing spar and us used to attach the outter wings (at the spar). These are the pieces shown on the right here:
 We found a day we both had some time and I went to visit him. We spent the better part of a day trying to flatten the "learning curve" on using his setup. The parts are still being worked on, but after seeing his machine work I realized that this is the way to go - when it comes to producing Prowler parts.
Buying The Table - Dave and I discussed this topic for some time, weighing the pros & cons. In the end we decided to pursue getting out own CNC plasma set up. We started looking at the different companies and their machines. We found that their systems vary wildly in both cost and capability. Cabi has a PlasmaCAM system. It's a good system that comes standard with many features that are options with other manufacturer's systems. In the end, we were leaning more toward the Torchmate system. We were going to purchase a new 4' x 12' TM1 system, but found a used 4' x 8' system for sale in Fresno, CA. After nearly a month of negotiations, we purchased the used system. Turns out, it was very well built, it was hardly even used, it was fairly priced, and it is expandable to a 4' x 12' system. Here are some pix:


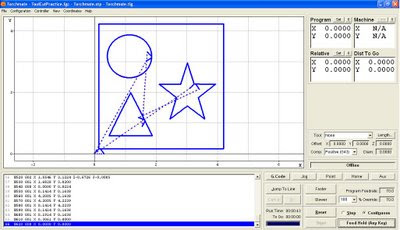
 The table came with the computer setup, but has had the hard drive reformated and a new operating system installed. The monitor has been replaced with an LCD monitor. We still have a lot more work to do before this becomes a useful tool in the Prowler shop. First off, we still have to purchase a plasma torch for it. I have been trying to learn how to use the software and I'm having some modest success. I have modeled my own "sample" part using the Torchmate CAD software. I have exported this file from the CAD software as a .dxf and then imported it into the Torchmate software that actually runs the machine. This software converts the "sample" part .dxf file into something called "G-code" which is what actaully makes the table move in the correct way to cut the part.
The Production Plan - While we were discussing the purchase of a CNC plasma system, we reviewed the parts breakdown of the Prowler and came to the determination that upwards of 95% of the basic airframe parts for the Prowler are made from 2 dimensional patterns. These parts are then either bent up into shape, or are in some way welded or attached to other pieces to form a larger part or assembly. So, our goal is to go forward and use this system to build our first airplane with the result that when we finish we will have modeled each part of the airplane for future use. Essentially we need to turn each of the patterns in these boxes:

 When we get ready to make another airframe, it should simply be a matter of putting the metal in the machine, pull up the files, and hit enter. Without having done any in-depth research, the hope is that we (using our system and Cabi's system) will be able to satisfy our production requirements - when we get to the point where we can start selling airframes.
Builder Contacts -
Ray Siem - We have stopped by again to visit Ray. He has made some significant progress on installing the systems back onto his airframe. He has installed the fuel and hydraulic systems. His main and tail landing gear are installed. He is in the process of making final decisions on his instrument panel and systems. Compare these pix with ones from a previous post:


Ray has an extensive collection of pictures that he has taken while working on his airplane. His pix are a collection of shots of George's , Chuck's, and his airplane. They are a great reference for building one of these airplanes from scratch. We are in the process of scanning all these pix into data files for computer storage.
Chuck Westcott - We have a meeting sked with Chuck for Tuesday, Nov 25th. He is based at the Salinas, CA airport and is planning on the second flight of his Prowler just after Thanksgiving Day. We hope to be there when it happens to learn as much as we can and document the occasion. More to follow.
Bryan Davies - Bryan's mother has passed away recently. Our sorrow and condolences go out to you for your loss Bryan. He has had to put the Prowler on hold for a while while he works on settling his mother's estate.
Steven Rogers - We (including Bryan Davies) had planned to go visit Steve in Sept, but had scheduling problems. Once Bryan is ready to go again, we will work out trying to schedule a visit to see Steve. We are really looking forward to the visit Steve!
That's the big stuff for now. Thanks again for checking in on us.

 Also, the pieces were scribed to the pattern and then cut just outside of the scribe lines. This leaves enough material to file down the edges to a smooth finish. Turns out this represents a lot of filing. So, on to a better way.
 2) Cut two 1/4" spacer strips for each pattern. One spacer strip goes under the entire stack and provides room to have a counter-sunk bolt head. The other is to provide room between the roller bearing (that rides on the pattern) and the actual cutting part of the bit . This keeps the pattern a good distance from the cutting edges and prevents chewing up he pattern. See pic in item 4 below.
 4) bolt the "stack" together and adjust the router depth to get the correct height for the pattern to ride on the roller-bearing:
 5) Make a
  The next item to work on are the bearing blocks. They are rectangular blocks that surround the bearing and are clamped under the wing attach brackets.
 By mounting the drill deck (table) under the bench top the drill can just penetrate into the bench top and (most importantly) the head of the drill press is now height adjustable above the bench top buy loosening the drill deck handle and adjusting it.
 Make sure to square the head of the drill press to the bench top. We used a
 Vertical Stabilizer Sub-Kit - Armed with the new spreadsheets, we now have an idea of what inventory items currently exists in each sub-kit and what we will need to fabricate to complete an airplane. The first sub-kit on the list was the vertical stabilizer. Turns out that we had all but about 4 parts we needed to

 Once that was done we drilled the skin and built a crate to ship it to the "
 Now it's on to the fabricatiion and
  This is the steel sheets, steel tubing, bearings, hardware, etc., needed to assemble the Tail Group Sub-Kits and the Wing Group 1 Sub-kits. Hard to believe, or maybe not, that including shipping this pile of stuff represents over $1K worth of materials. In some cases there is enough material to make more than 1 airplane, but some things have to be bought in a minimum order - so that's what ya get.


