As promised in my last update, here's another Prowler blog update with more information on several items related to Prowler Aviation. First, and foremost, two Prowlers have new owners (both George Morse and Rick Pelliciotti have sold their Prowler aircraft). Then, I have some builder updates. And, last, I have a couple updates on some projects that I've been working on around the shop. Here's the list:
1. Introducing Bryce Mitchell and Ernest Zwicki
2. Builder Updates:
2.A. Bud's Update
2.B. Ray's Update
2.C. Bryan's Update
2.C. Francis and Robert's Update
2.E. Kit #6 Sale Update
2.F. My Kit #18 Update
3. Update on 400 Ton Press
4. Local EAA Chapter Mobile Simulator Project
5. Backup Generator Shed Project
Of course, the most exciting news is the sale of two Prowler aircraft. George's airplane has been for sale since I bought Prowler Aviation. So, it's great to see the airplane finally find a new home. You might recall very early blog posts where I had pics and videos of that airplane stored on a trailer in one of my sheds. I used to really enjoy helping George pull the airplane out of the shed at start it up. The sound of that straight piped V8 really gets the senses stirring. And, it used to really motivate me more to get hot on trying to get production going! It was also helpful having that airplane handy to take measurements off of, or to just take pics of areas of the plane that I was working on when I needed more insight. It will be sad not having it around the local area any longer.
On a happier note, the original production Prowler (Jaguar) will be coming back much closer to home. The RW&B airplane is now going to be based near Sacramento. I can't wait for the day that it is airworthy again! I sure hope that I can be there. Here's more about both airplanes and their new owners:
1. Introducing Bryce Mitchell and Ernest Zwicki - As mentioned, two Prowlers were sold recently. In fact, they changed hands in the exact same week - as near as I can tell! Again, both George and Rick sold their aircraft to new owners: Bryce Mitchell and Ernest Zwicki. Here is a little info that I have on each of these new Prowler owners:
Bryce Mitchell - Bryce purchased the Red, White & Blue airplane (the 1st production Prowler Jaguar) from Rick Pelliciotti in Memphis, TN. Rick told me that he was very happy to have saved this aircraft from "the barn" in FL several years ago, but now for many personal reasons, it was time to sell the airplane and get it into the hands of someone that will get it flying and take great care of it.
Having (now) met Bryce, I believe Bryce is the perfect person to take on that challenge. Bryce is a Firefighter and lives near Sacramento, CA. He is an A&P and was looking for a "fixer-upper" type project, versus building an aircraft from scratch (or a kit). He drove up one weekend about 8 weeks ago to see the Prowler shop. We had a great day talking Prowlers together and I enjoyed showing him around the shop. After our meeting I get the feeling that Bryce is the perfect individual to restore the original production Prowler back to airworthy condition.
Bryce hired a moving service to pick up the airplane and deliver it to it's new home (not very far from it's first, original home here in Redding, CA). Rick and Bryan were on hand to help the mover get the airplane loaded in Memphis. Here are some pics that Bryan sent to me. They first pulled the airplane up onto a tilt-bed truck:


I emailed Bryce just a few days ago, and he reports the following:
I ended up just paying a shipping company to transport it. I was way worth the extra money. Plane arrived safely the other day. Now I'm just cleaning off the years of dust and grime. It is in actually remarkably good shape. Bryan was a HUGE help with getting loaded. I owe [him] big time.
That is awesome! I/we are really happy that your airplane made the trip safe-n-sound and in good shape. Bryce also promises to send some pics occasionally to update us on his progress. Thank you and welcome aboard, Bryce!
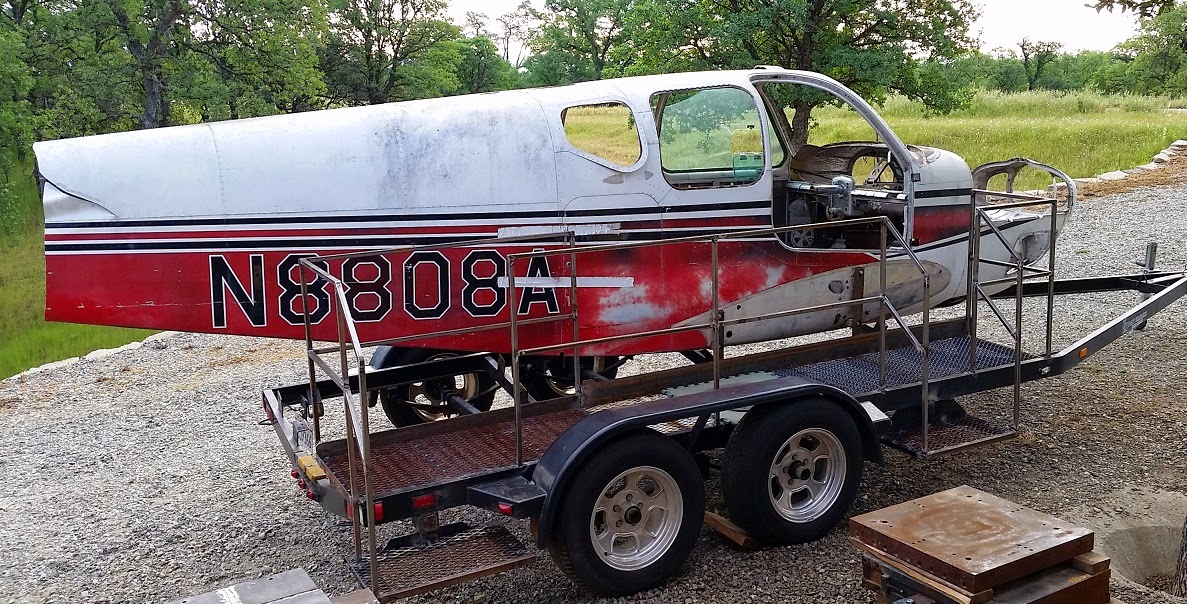
Ernest Zwicki - In the same week, George sold his 3rd airplane (Black & Silver) to Ernest. Ernest flies for Alaska Airlines and is based near Seattle, WA. Here is a picture of the airplane on the day that Ernest was taking his Prowler home:

However, on the initial local flight, there was a hydraulic system failure combined with a report of white smoke coming from the aircraft. Despite his best efforts to expeditiously troubleshoot the hydraulic problem and with the looming threat of an inflight fire, Ernest made the tough call to land the aircraft with the gear retracted (the hydraulic failure prevented the uplocks from releasing). Turns out, the smoke was most likely just an aerosol of hydraulic fluid. But, you know the rule - when in flight, you treat any indication of a fire as if it is a real fire!
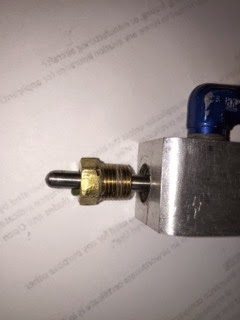
Total heartbreaker!!! However, he did have the aircraft insured, and Ernest is insistent that he will rebuild the aircraft. We have already had several discussions related to systems and parts that will be required to repair the airplane. In fact, in my most recent exchange with Ernest, he sent a picture of the culprit - a hydraulic sequencing valve that blew the O-ring out of the valve's stem (plunger) seal:
In a fashion almost identical to the two other gear-up landing incidents that I am familiar with in a Prowler, the plane basically came to rest on the radiators and a prop blade. So far, the damage seems to be limited to the radiator housings, radiator doors, inner gear doors, and, of course, the engine, prop and PSRU (the FWF systems).
It looks to me like Ernest did an awesome job of setting the airplane down at a speed, attitude and sink rate that completely minimized the damage. You can see in this picture that the damage to this radiator was pretty much limited to only the inboard side of the radiator housing.


Welcome aboard the Prowler Group, Ernest. I am so sorry that your first experience with your new airplane had to end this way. Rest assured that I will do whatever I can to support you and help make sure that you get the aircraft repaired and back to airworthy condition.
I also know that the entire Prowler group will also help support you in this endeavor. No matter what you find yourself up against, with an email to the group you will find whatever help and information that you need. Someone out there will have some kind of experience with the problem you might have - and they will be able to give you sound advice on how to go about solving it. That has been my experience so far with anyone's issue that I have become aware of over the past (almost) 10 years.
So, again Ernest, welcome aboard and GREAT JOB handling the inflight emergencies you faced!
2. Builder Updates:
2.A. Bud's Update- - I just exchanged emails with Bud a couple days ago discussing my 400 ton press. I asked him if he'd be doing any flying with his Prowler lately. He responded with:
Yes,
I flew today. My constant speed prop governor wasn’t governing. I could set an
RPM, and as long as everything was constant, the RPM would remain the same.
However, if I raise or lowered the nose of the airplane, the RPM changed
accordingly; as much as 300-400 rpm. The same with throttle movement. I had a
variable pitch, variable speed governor. Today’s flight was a test after the
prop shop put a heavier spring on the oil pressure output controller. Now the
variations are a reasonable +/- 30-40 RPMs. Today’s flight raised my TT to 94.0
hrs Bud
Really happy to see that you're still building time on the airplane, Bud. Thanks for the update.
2.B. Ray's Update - I got an email from Ray in late March with a status update of his Prowler project. Ray as been working on several other projects lately and the plane has been on hold for a the last little while. Anyway, according to Ray:
It’s (the plane) running again, no major problems with the engine and systems since you last saw it. Priming the fuel system is a bit of a problem with low levels of fuel in the tanks. I have gotten the aux tank pumped 5/8 full from the aft wing tanks and then the tanks became too low to continue. I will later have to raise the tail to about a 3 deg nose high to simulate flight to see how much fuel can be recovered from the various tanks.
As of now the tanks leaks appear to be one on the aft tank
top skin where the last tank rivets were put in. The rite forward tank leak and
the left aft tank leaks look like it was the Pro-seal not sticking to the lower
wing skin when the tank external drains were installed. I removed them and used
Halomar-blue to re-seal them when I re-fitted them. The Left aft tank upper
leak will have to be fixed when the wings come off to replace the fuel line with
ethanol compatible fuel lines
The battery has died, just had enough charge to get it started right after removing the charger. Let it sit 15 mins and it was no start.
After the new battery I will add more fuel and get it out and start moving it under it’s own power.
Ray
The battery has died, just had enough charge to get it started right after removing the charger. Let it sit 15 mins and it was no start.
After the new battery I will add more fuel and get it out and start moving it under it’s own power.
Ray
Thanks for the update, Ray. We are all anxiously awaiting your first flight!!
2.C. Bryan's Update - Bryan has been tackling several frustrating and challenging issues lately. Here's his latest report:
It was one tuff week in the ongoing saga of aircraft construction. Some highlights:
I inadvertently tagged a wire while cleaning up a rivet hole with a drill. That required climbing into the deep recesses of the airframe for resolution. A veteran spelunker would have been amazed at the physical gyrations necessary to get all 6'4" and 245lbs of me into the area that had the wire needing repair.
Then, the flap motor would only operate in the extend position. Climbing in the cockpit while upside down and backwards happened to dislodge the flap sensor wires.
The master caution light failed its initial tests, Dynon instructions were not as clear as they needed to be and I had to pull the instrument panel to rewire the light.
My VP [Vertical Power] box does an amazing amount of magic, it figured [out that] I had a fault on my low fuel alert system - As careful as I was in the wiring phase [to make sure] it was correct. [It] Took me a while to find where but the left tank capacitance rod wiring was at fault.
Then disaster #1. I was sitting in the cockpit programming my Skyview display and I smelled electrical smoke. Within 5 seconds the cloud of smoke was overwhelming and obscuring vision and breathing. I am of course
extricating my self from the cockpit at a fantastic rate of speed to discover the GPU wires had shorted and were on fire. I was amazed at the energy that 24vdc batteries can produce as the GPU wires had turned glowing red hot as I lunged from the wing to disconnect them with a swift kick. VP again saves the day. With all that adrenaline starting to dissipate I decided to give myself a break and [I decompressed] while configuring the aircraft back to a normal configuration, i.e. flaps up, gear down and all systems shutdown.
Disaster #2. I selected gear down... the system came alive and after a few moments I had three green lights but the gear motor would not shut off. I pulled the CB and climbed down to discover the result you see in the picture.


Potential Disaster #3. Flying for a living then working on my airplane in spare time opens a door for inconsistency. While disassembling the gear door for repair I was inspecting the surrounding structure and found two of the original wing spar bolts that were set aside at some point in the construction process and never recovered.

In the mean time, I'll have plenty of time to resolve any other issues I may discover as DeltaHawk will not have an engine ready for me until years end at best.
Also, on a sad note, the RW&B aircraft now resides in California. Having it here with Rick allowed me complete access to evaluate, view, measure and most importantly take molds of the fairings has been an incomprehensible blessing. Then our EAA chapter lost their hangar and we had to clear out fast. The 8' metal break they owned had been a lifesaver in building additional parts for the airframe and now its gone. Hopefully I made enough channel and angle and then some to get me through cowling construction. We will see...
Awesome update, Bryan! Sorry for the bad luck there, lately. But, you recovered well and you've obviously been very busy. I/we are happy that everything worked out well, in the end. Thanks for all you do to help the Prowler community - I know that Bryce was very thankful for your help.
2.D. Francis and Robert's Update - The most recent update from Francis & Robert was from Mar 20th. Francis reports:
Hello Todd
When we received the ribs [you made] I worked on mocking up the wing. [The left wing]:

Sorry to hear that you were not feeling well, Francis - we're happy to hear you are back in action again. You've still made some REALLY good progress!! Thanks for the update!!
2.E. Kit #6 Sale Update - Bryan has recently listed Kit #6 on Barnstormers. You can see the listing here:
https://www.barnstormers.com/cat.php?mode=search
According to Bryan: The kit has been advertised for 13 days the count is 14,758 views and 732 picture views with the farthest interested individual was from Argentina.
2.F. My Kit #18 Update - I have been taking advantage of any opportunity I get to knock out (complete) a few more sub-kits on the kit that I have upstairs in my office above the shop. Recently, I discovered that the only part that I needed to complete the Flaps Sub-Kit was a set of the flap actuators that mount to the forward spar of the inboard flap segments. Here is a pic of most of the parts after fabrication and before welding:


3. Update on 400 Ton Press - In the last blog updated, I showed the start of the work to machine the bolster to the correct size to fit up and into the rubber box. The pic below shows the bolster with the top machined flat and true on as much of the part as I can on the first pass. The bolster is too long for my mill to be able to complete a pass on the whole length of the part. So, I could only do about 85% of the length in one pass. This pic shows the start of the side milling to get the width and length to the desired dimensions. I machined the sides in 3 ruff passes, each 1 inch at a time. Then, followed that with one pass with a standard (smooth) endmill. Here is the start of the first 1 inch ruff pass:


I am hoping to get started on the Belzona repairs to the cylinder walls and ram during a block of 9 days off from work starting in the 3rd week of May. I'll report back on that soon.
4. Local EAA Chapter Mobile Simulator Project - A few updates ago, I showed the beginning of a project for the local EAA chapter to build a mobile (no motion) simulator to use at local EAA and airshow events. While my dad was in the shop for a few weeks, I had to leave for a few days to go do the "day job." While I was gone to work, he worked on finishing the catwalk and handrails for the simulator project:
That way, they will know what to expect just a little more and they will get to "see" what it will look like out the front window twice. If the "repetition" law of learning holds true, each YE will be able to better remember their YE flight. There will also be a "Free Flight" mode on the simulator so that they each can also "fly" the sim for a while.


I only have one more thing to add, before the whole project goes off to another volunteer for sand blasting and paint. I'm going to add pockets to drop the legs of a canopy into - to provide shade for the EAA volunteers and YE riders while in the cockpit area.
Ultimately, this simulator will be equipped with a generator, computers, LCD monitors, yokes, and seats. In addition to this work, the fuselage needs an engine compartment cover, Plexiglas windows replaced, lots of cleaning, firewall & bulkhead work, among other things. So, there is definitely much more to do on this project. I'll update on this project again in the future.
5. Backup Generator Shed Project - For a few years now, I've had a emergency backup diesel generator built and ready to do it's job - when the power company drops the ball. However, that generator has been hanging out, taking up space in my shop. I need it out of there.
I guess this topic is not directly related to Prowler Aviation, except with this generator set up, I'll be able to have power and continue to make Prowler parts - even if PG&E power goes out!
So, anyway, this winter I got started on building a shed to hold my generator and other power systems that I have planned. In Jan, I got started by forming up the 1st half of the slap for the new building:


Eventually it got insulation in (I want this to be soundproof as possible):


BTW - in our county the local laws allow you to build up to a 120 sq. ft. building without a permit. This is to allow for building of pump houses, and small storage sheds, etc. I bought recycled lumber off of Craigslist and used repurposed materials wherever I could. Even with that, it's amazing how expensive just this small 10' x 12' building can be!!
__________________________________________
Well, that's all for this update. My focus for the next few weeks & months will be to complete the repairs to the 400 ton press and make parts for Ernest to repair his Prowler. While I am making parts for Ernest, if there are any parts I can make in conjunction that I need for Kit #18, I'll probably make them as well. But, right now I'm off to do a bunch of mowing, weed whacking and other everyday homeowner duties - oh, and the girls want the pool set up again for this summer.....etc., etc.
Thanks for stopping by to check out the progress of Prowler Aviation.


