Prowler Related Items:
1. Ray's Airworthiness Inspection
2. Improvements to FWF Mockup
3. Francis Making Excellent Progress
4. Francis & Pancho Meet Up in TX
5. Great Progress from Eric in Montreal
Non-Prowler Items:
1. EAA B-17 (Aluminum Overcast) Ride
2. Yale Forklift
3. Bridgeport Vise Handle
You can see from the list above that so far this year there have been a few Prowler accomplishments to report - although I was not involved in any of them except for one. For most of the past 3 months I have focused most of my free time on projects that are not directly related to the Prowler. The biggest one has been overhauling an almost 60 year old forklift that I purchased earlier this year.
Before I get into the update, I wanted to just say quickly that we will have the normal contingent present at AirVenture this year. For a while I thought that we might have a Prowler airplane there in 2017 - but after some discussion it looks like that will now wait until 2018. Instead, this year I will have two of my daughters participating in the 4 day "Women Soar, You Soar" day camps and be spending time with them. But, plan on having an exciting assortment of Prowler presence at AirVenture 2018!
Now, on with the update.
Prowler Related Items:
1. Ray's Airworthiness Inspection - The most exciting Prowler news of the year is that Ray has completed his airworthiness inspection! Shortly before the inspections, Ray emailed me that he'd finished some final engine work and said:
Hi Todd,
Got the engine started today.
After getting the fuel system primed it wasn’t too hard to get running again,
burped and farted a bit at first and then cleaned up pretty well. I took it out
to the run area north of the hangar and ran it out of gas trying to get it to
overheat.. 73F today, couldn’t get the oil or coolant above 180F. The gear box
is smooth, no leaks , no indications of any problems.
I have the airworthiness
inspection scheduled for 05 Apr. I stayed late today and got it ready and
finished up some small detail stuff. Tomorrow I have to finish re-drawing the
electrical diagrams to incorporate the 12V to 24V regulators in the systems.
The extra speed of the motors is nice, they work at about the right speed now.
I ran the engine up to 32” hg by adding some boost and it’s more controllable
now. I also confirmed that above 28” it’s not possible to hold the aircraft
with the brakes when loading the prop.
Ray
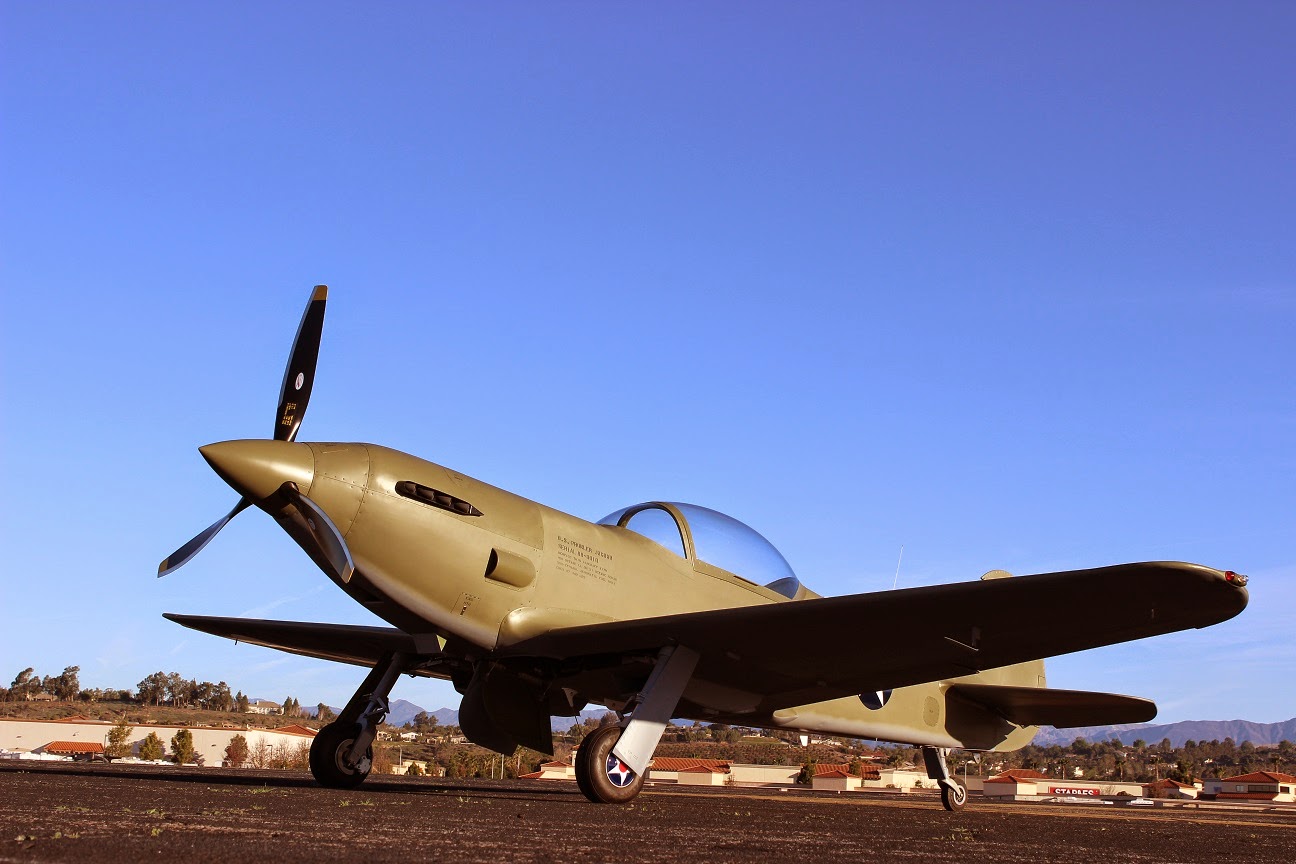
Unfortunately, I couldn't be around the day that Ray had his airworthiness inspection to get some pics. I would have liked to have been there to get some photos and to meet Dave Prizio. You might recognize that name. He is an FAA DAR and writes articles for Kitplanes. He was the DAR who completed the airworthiness inspection on Ray's Prowler. Since I couldn't be there, here's a file photo of Ray's plane.

Todd,
Passed the airworthiness inspection today. I can fly the airplane anytime I want now. A few changes to
some hardware and a placard for the fuel system. Next is to apply for the
repair man certificate.
Ray
That is outstanding!! Congrats, Ray! Awesome job!
Of course, this begs the question - "When will we see the 1st flight?" To that, Ray says:
"I got the El Camino out for the real first time today (May 15th). (Getting to) that was last week's project. Mostly good (to report), but a few disappointments to deal with. Once I get the car close to being done, I will really get into the flying again."
So, no set date yet - but, rest assured that I will be there if at all possible! I will keep you all posted!
2. Improvements to the Prowler FWF Mockup - While at AirVenture last year, I was talking with Stuart and Larry from AutoPSRU's and discussing the best process to get them involved to help create a FWF kit for the Prowler. We agreed that the 1st step would be to get an accurate mock-up of the front end of a Prowler. You might recall that I already built a mock-up for this several years ago (Paragraph 4 here). Here's a picture from back then:

Using the dimensions and measurements from Ray's Prowler build (Thank you, Ray, for letting me help you install your engine and get the info I needed) I was able to build up the cart, firewall and the center point of the prop hub front flange. Then, I collected LS engine parts and built an engine stand. Back then, I did not have the cash to lay out for a Geared Drives PSRU - so I used dimensions available on the internet to build my own mock-up of the PSRU (in yellow above).
In my discussions with Stuart and Larry, we agreed that the next step would be to commission them to build me a motor mount that would fit the Prowler firewall mounting holes. Once I had that, I would mount it in my mock-up and then re-install the motor and my PSRU mock-up. At that point, Stuart offered to ship me a run-out (damaged) PSRU case that I could use with my mock-up. Awesome! That would give me the ability to get really accurate measurements for my engine compartment components.
In early January, Stuart shipped me the damaged PSRU. Here's what it looked like when I got the box off of the outside:


It turns out that my home-brew mock-up PSRU was really pretty close in dimensions to the real thing. Using both the real and the mocked up PSRU case, the "pinch point" is along the forward, lower edge of the PSRU where the engine compartment skins smoothly slope upward toward the bottom of the prop spinner. You can compare this area in these two pics:
OLD:


So, at this point Larry is building me a motor mount. Once I get that from him, I'll install it into my mock-up. (That'll be great, because I will be able to get rid of the engine stand which will allow me access to the entire surface around the engine.) Later, Larry will make me a set of exhaust manifolds that they use with their FWF system and I will install them. When I get to that point, I will do a precise placement of the center of the prop hub and one final alignment of the thrust centerline. From there on, I will finally have the true dimensions I need to finalize the "new" Prowler engine compartment. I will be able to place the engine compartment longerons in the most appropriate places and then design the skin panels that will fit on the longerons. There will be more to report on this once I get the motor mount from Larry. Stay tuned.
3. Francis Is Making Excellent Progress - Currently, Francis is my "Rock Star" builder. He is at the point in his build where everything you do adds significantly to the project as a whole. At some point, he will also get to the "75% complete, 75% to go" point. But for now he making consistent, steady, visible progress and he sends me an email every couple of weeks with pictures to share this with you. [Thank you for sharing your progress, Francis.] So far this year, in no particular order, Francis has accomplished the following items.
A. Finished installing his torque boxes and aligned his gear torque tubes:


4. Francis & Pancho Meet Up in TX - I got an email from Francis earlier this month saying that he was going to be vacationing with his family in TX. He was wondering if he might be able to visit any of our Prowler builders there.
Hello, Todd
For the (my) vacation, I am going with my little family to Texas and New Mexico, from
08 till 20 April.
Perhaps, if my girl friend accept and prowler builder accept, I can visit Pancho (Franck Kinkaid) and some other guys if they have their birds in Texas or New Mexico (and if possibility of their time and mine match)?
Thanks,
Francis
Frog Prowler kit 11
Later, I got this from Francis:
Hello Todd,
Finally I can (got to) meet a very good guy "Pancho" I spent a small (short) 2 hour with him!
Pancho's Prowler is stored in two containers! (under lot of parts helicopter and other airplane parts!!)
Miraculously, I found the part that I think I need !! (It's) the part between the two hand (joy) sticks!
So, I take some dimensions ,with a paper band graduated (paper ruler). I send to you an approximate drawing when I can do it!
I think that not by hazard (chance)! I think you have prepared my landing at the Pancho Prowler place! Like a donk, I forgot to take some pictures!!
thank you Todd and Pancho
That's re-boost me! (Gets me re-motivated).
How cool is that!?!? I sent back an email to both Francis and Pancho thanking them for the update and thanking Pancho for his hospitality! It's incredible to see Prowler guys from two different countries getting together to talk Prowlers. Excellent! Afterward, Pancho sent me this:
Hey Todd,
Yes it was great to meet Francis . . . It was a kinda last minute deal as he emailed me only the day before saying he was in San Antonio and could we meet the next day . . . . well I was due to have a 180'x90' metal building delivered the next day and told Francis I could not meet, unless something changed.
Well things did change (the trucks got rescheduled elsewhere) so with about an hour or two's notice Francis decided to stop by on his way through to Houston . . ..so it was a short visit , lol The part in question that Francis took measurements of, I can take a picture and send it to you if that will help, (was thinking there might be a part number marked on it with indelible marker . . . I will check. . . . . . ahhh no part number ! )
I know all to well of the feeling you speak . . ..lol, it frustrates me so much to see my Prowler parts and not be in a position to get started on it . . . . life gets in the way . . . . :)
Regards, Pancho.
I am really glad that it worked out and they were able to get together - even if it was just a short visit. Again, Pancho, thank you for your hospitality without a lot of notice. And, Francis, thank you for taking the initiative to meet with us Prowler guys. I also enjoyed our meeting a few years ago. Unfortunately, it was also short. Maybe, we can all get together at AirVenture 2018 when we will have a Prowler (or Prowlers) on the field!!
5. Great Progress from Eric - In March, Eric sent me a photo of his Prowler project. You might recall that he purchased Kit #6 from Bryan and I about 15 months ago. Turns out, Eric has been really going gang-busters and has made outstanding progress on his Prowler too! Take a look:

As a side note: Recently, Bryce contacted me about the crankshaft that I'd gotten from George. He stated that Eric was interested the engine parts that he had for sale. In April, I delivered the crankshaft to Bryce. Bryce completed the sale and Eric now has almost everything he needs to put the George Morse Rodeck FWF system in his airplane. I'm glad that Bryce's engine items found a great home with Eric.
Non-Prowler Items:
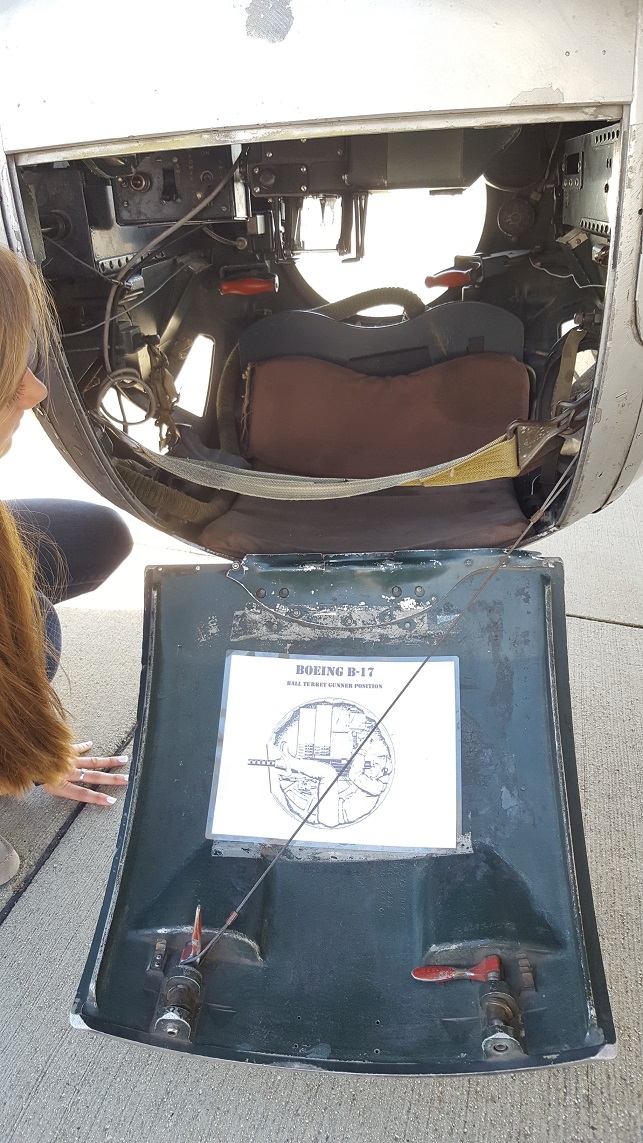
1. EAA B-17 (Aluminum Overcast) Ride -
Recently, the EAA's B-17 "Aluminum Overcast" was in Redding on it's around the country tour. Our local EAA chapter president, Jim Bremmer, was seeking volunteers to help with handling the event over the 4+ days that it would be at KRDD. I decided to go to the airport on Thurs to help out, if I could. Here is a picture of it on the ramp that day:

Well, what a treat! It was an awesome experience! The EAA volunteers that work to keep these aircraft tours going around the country are incredibly, knowledgeable, professional and dedicated individuals. They typically spend two week assignments working on the tour before they are relieved by another group of volunteers. I am very thankful to the crew that provided our community with the opportunity to enjoy this amazing aircraft.
The flight was a hoot! I took many pictures and videos that day. Here are just a few of them:
Boarding:


A. In WWII, we sent up 10 men in these aircraft that ranged in age from 18 (at least that is what they claimed - some were younger!) to somewhere in their mid to late 20's. Typically, the pilots would be the oldest and the remainder of the crew were in their teens or early 20's. These men took these aircraft into combat in conditions that were very arduous (at best), to fatal (at worst). Imagine grabbing a cross section of individuals those ages today and placing them in those same positions. I wonder how that'd go?
B. The bombardier had the best seat in the house. The view during flight is like no other! Also, the story of the Norden bombsight is very interesting.
Overall, this was an incredibly interesting and enjoyable learning experience. It was equally awesome that I was able to share some of it with one of my daughters. If you get the opportunity to catch the B-17 tour in your area, I highly recommend to get out, support the EAA and take in this important part of our aviation history.
2. Yale Forklift - I've been searching for a forklift for years now. Occasionally, I have a need for one when I buy a piece of equipment or need to move something. But, I just couldn't see investing a huge amount of money for something I might use 3-4 times a year. In Feb, I found a Craigslist ad for a 4,000 lbs forklift that seemed like what I needed at a reasonable cost. I checked it out. Sure, it was going to need some work - but, decided to buy it. Here it is on moving day just off the trailer:


A. Replace & relocate battery. The battery was mounted in the engine compartment and it was on a hinged platform that it could be "sort of" swung out of the way. But, it was really in the way and it made it hard to get at the right side of the engine. So, I made up a new battery holder:


C. Carb needed rebuild. The carb was old and leaking and causing the engine to idle roughly.


3. Bridgeport Vise Handle - This was a quick project that I wanted to share with everyone. Maybe you'll have a similar problem to solve someday. I bought an original Bridgeport vise recently. I cleaned it up and it works well.

However, everyone has one of the millions of Chinese these vise handles laying around. I have two of them. They have a 3/4" hex hole and look like this:

So, I went on Amazon and looked for the cheapest, largest 3/4" drive socket I could find. I found one that was 1-1/8" for $3.50. Perfect! Once it arrived, I found out that it was a still a little too small to slip over the Chinese vise handle hex end and would need a little working in the lathe to open it up a bit:


That's all for this update. Thanks for stopping by. I'll probably get my next update posted after AirVenture in Aug. Have a great summer, everyone!